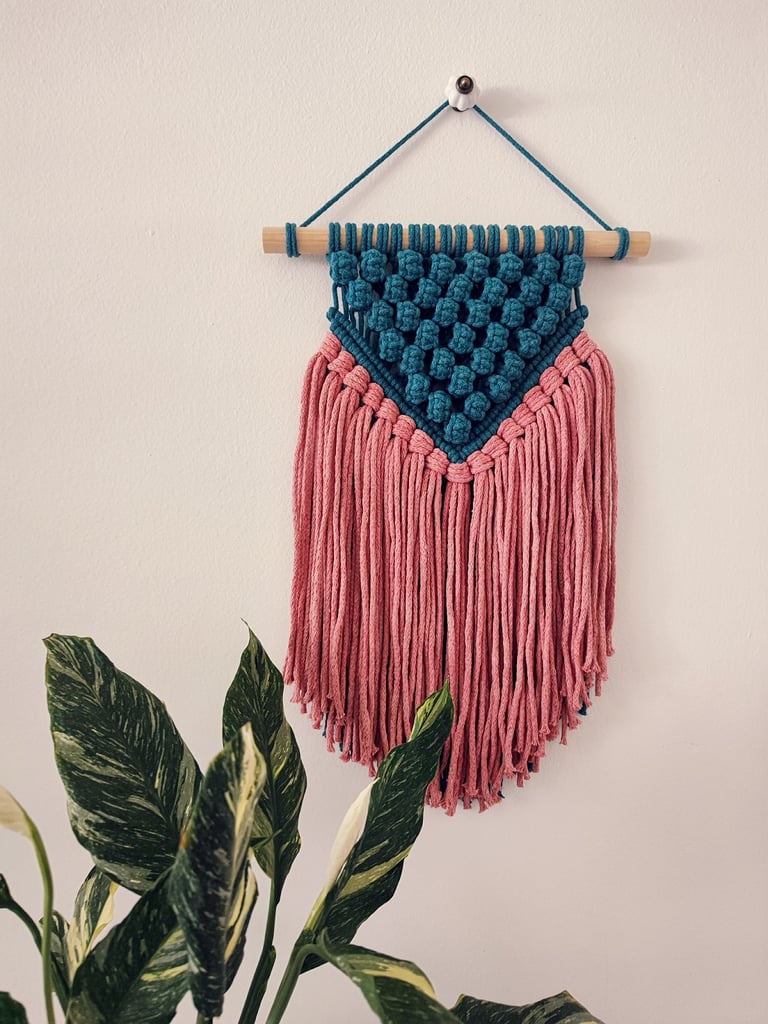
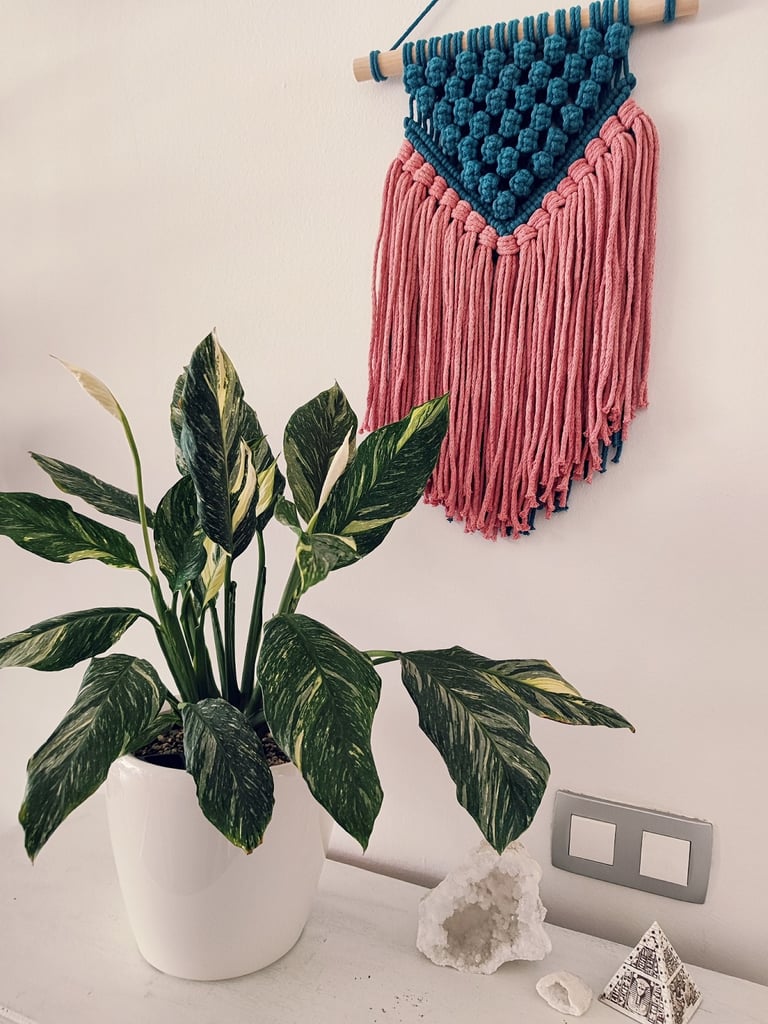
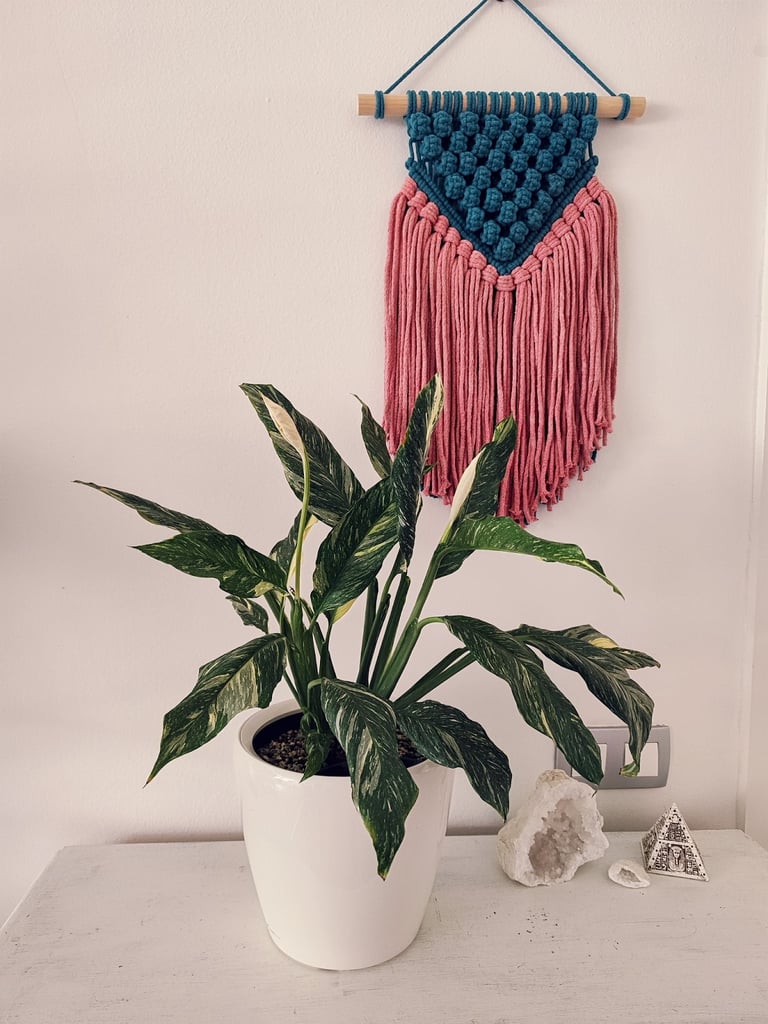
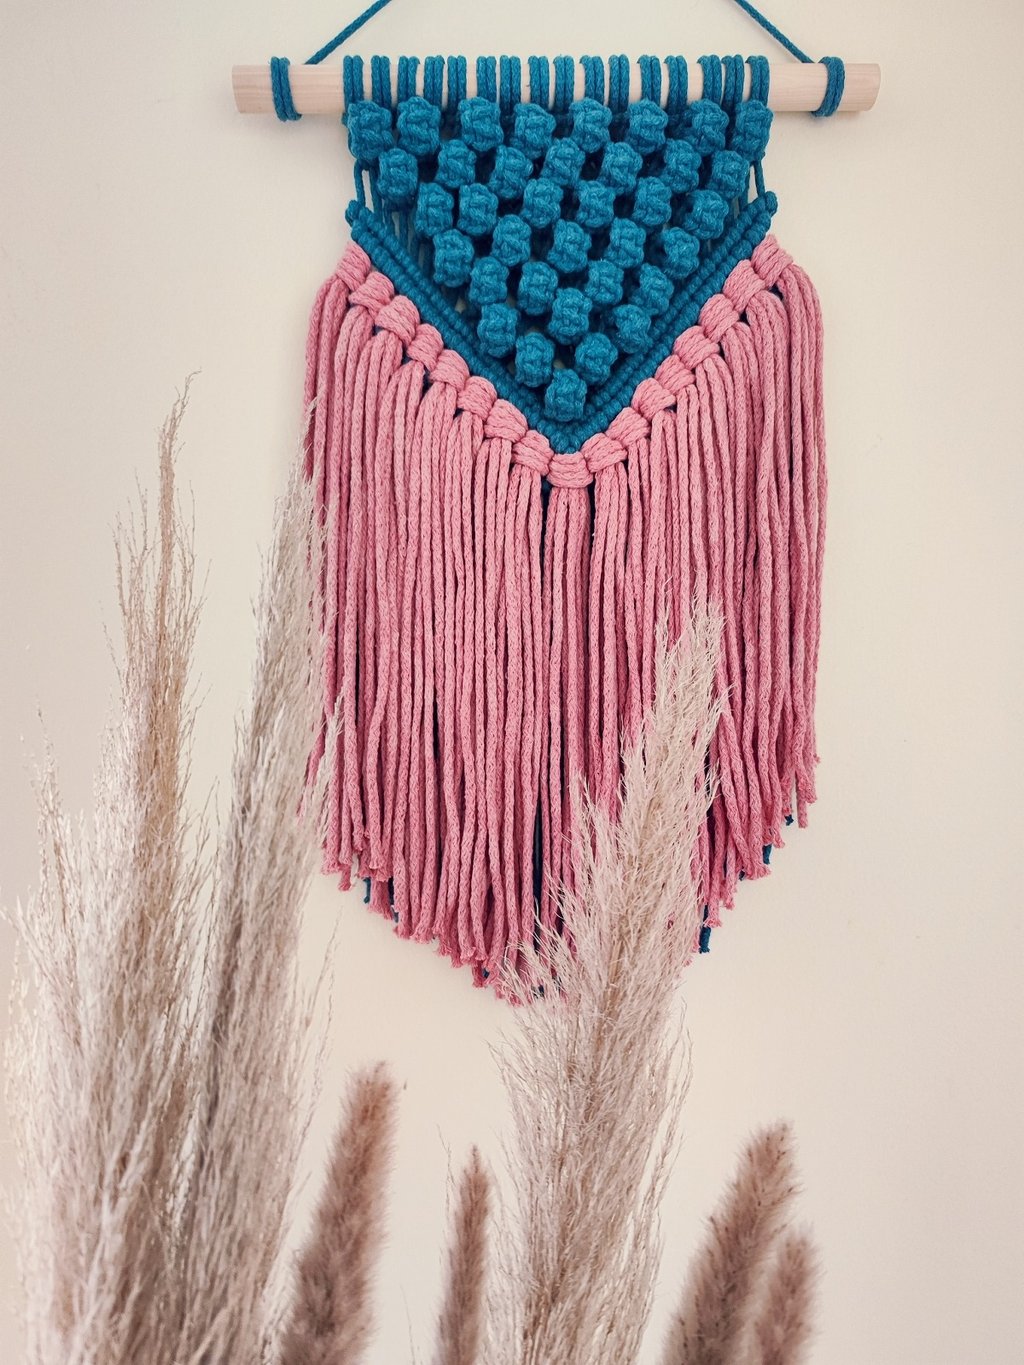
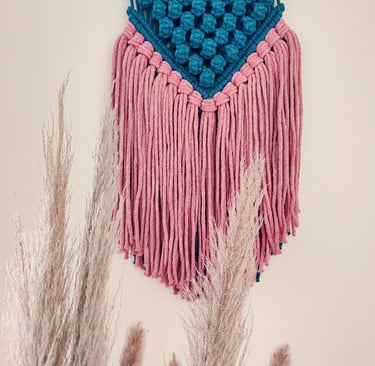
Berry Macrame Wall Hanging
Looking for a relaxing and creative project with a bit of charm? This Berry Macrame Wall Hanging is just the thing. With soft curves and pretty, berry-like details, it adds a lovely, handmade touch to any space — perfect for cozy corners or thoughtful gifts. In this step-by-step tutorial, I’ll walk you through the entire process, making it easy and enjoyable whether you’re just starting out or already in love with macrame. It’s all about slowing down, getting into the rhythm, and making something beautiful with your own two hands. So grab your cord, put on your favorite playlist, and let’s create something sweet and special together!
TUTORIALS WALL HANGING
Vixie Macrame
8/1/20258 min read
Welcome to this Berry Macrame Wall Hanging tutorial — I’m so happy you’re here! 🌸
This design is one of my favorites — soft, a little playful, and full of those sweet little details that make handmade things feel extra special. Whether you're completely new to macrame or already a fan of knotting, this tutorial is meant to guide you gently through each step.
So take your time, enjoy the process, and let yourself fall into the calming rhythm of creating something beautiful. Let’s get started and bring this lovely Berry-inspired piece to life!
MATERIALS YOU WILL NEED:
TOOLS YOU WILL NEED:
Scissors
Measuring tape
Clothing rack
Glue
CUTTING THE YARN:
8 x 500 cm (197˝); Berry part in Blue colour
8 x 400 cm (157.5˝); Berry part in Blue colour
2 x 100 cm (39.4˝); anchor cords in Blue colour
1 x 90 cm (35.4˝); hanging cord in Blue colour
68 x 70 cm (27.6˝); tassels in Pink colour
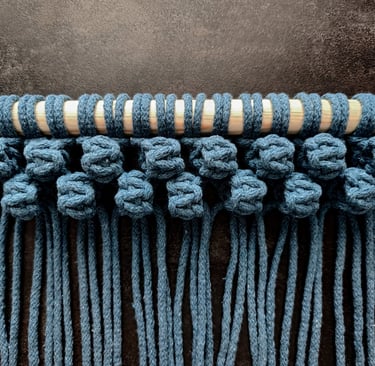
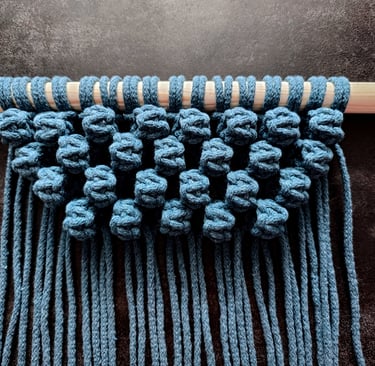
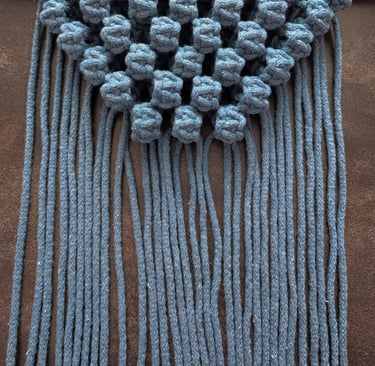
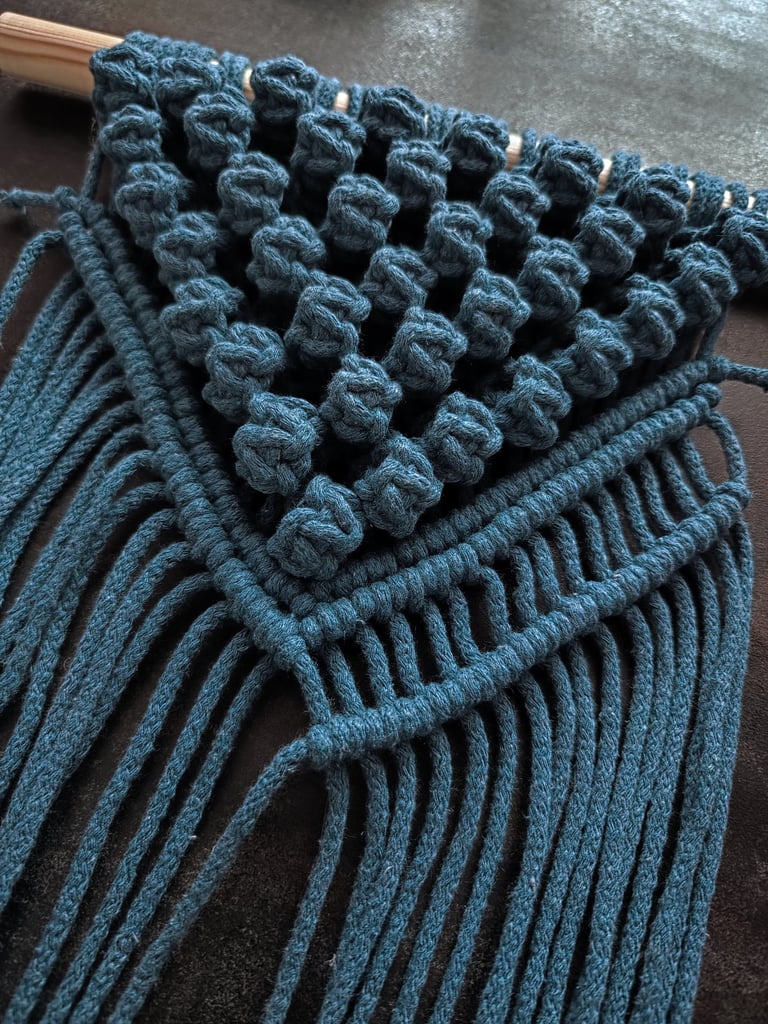
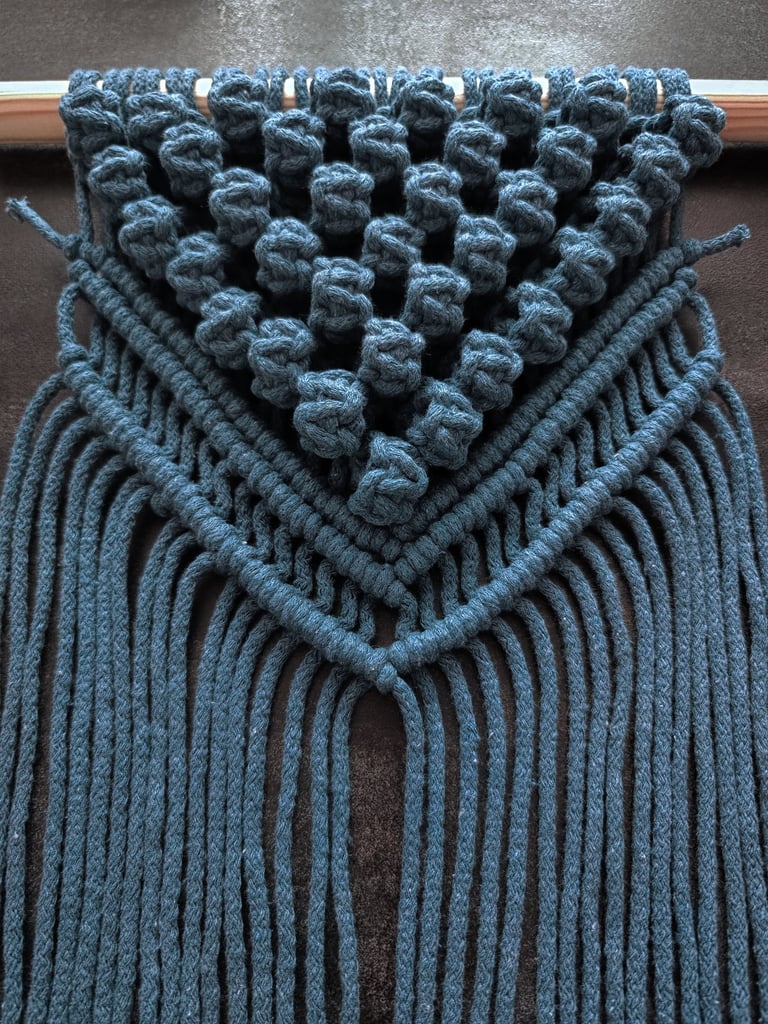
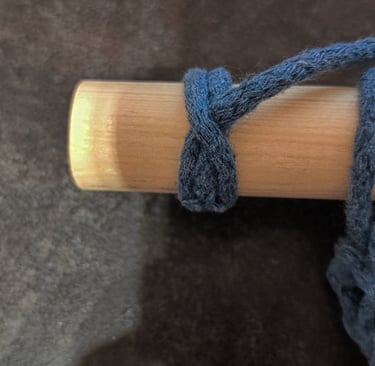
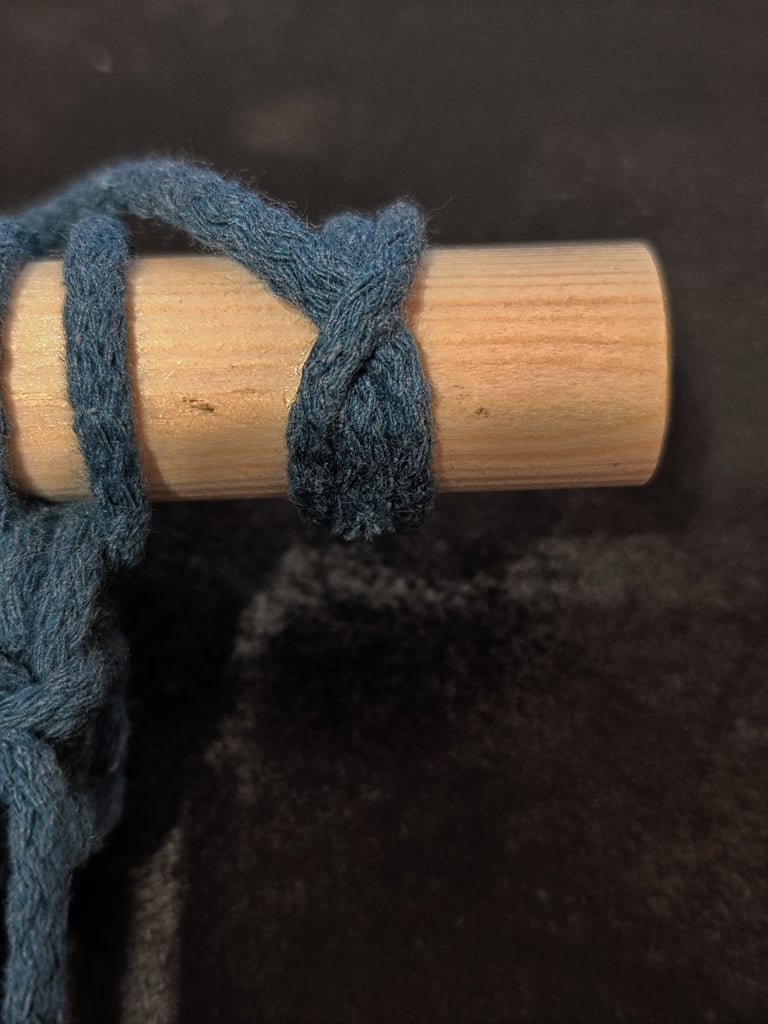
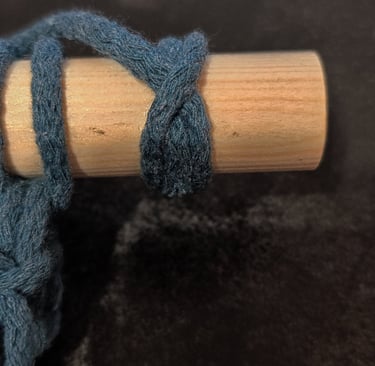
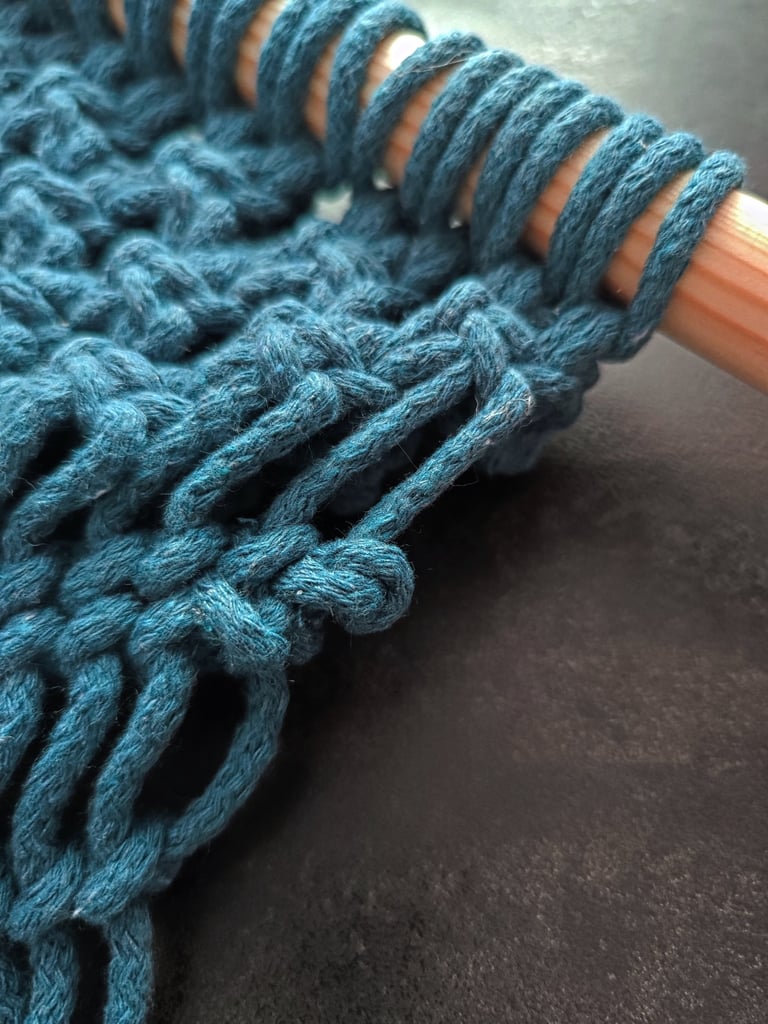
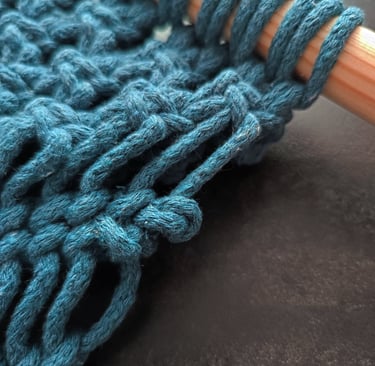
1. ATTACH THE BLUE CORDS TO THE WOODEN DOWEL ROD
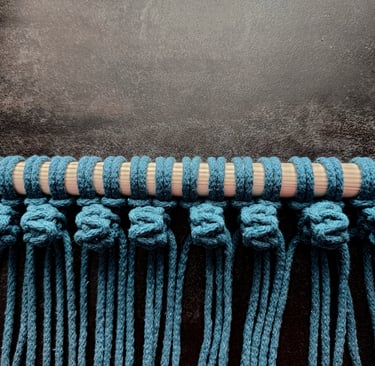
Start by cutting your yarn into cords. For the middle section, cut 8 cords, each measuring 500 cm (197”) long—these need extra length because you'll be making more Berry knots here. On both the left and right sides, cut 4 cords each (8 cords total), measuring 400 cm (157.5”) each. Attach all the cords to a wooden dowel rod using Lark’s Head knots to secure them in place.
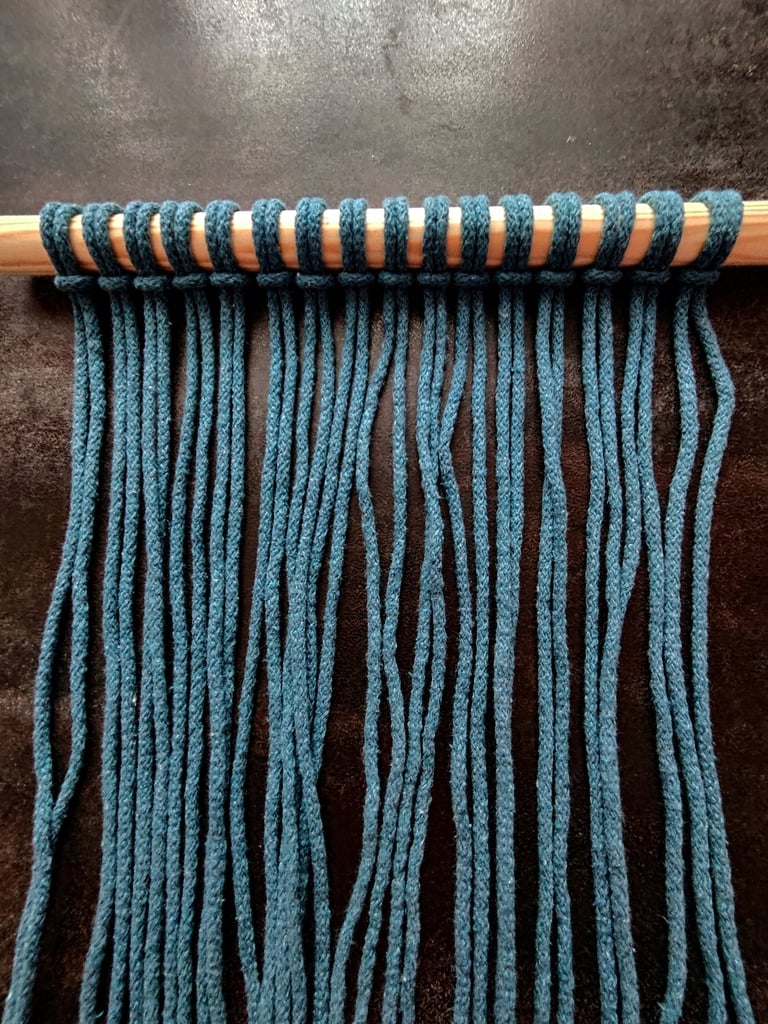
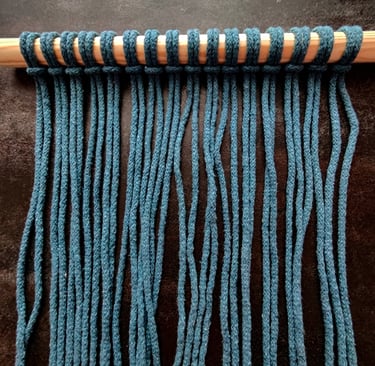
Attach 16 cords to the wooden dowel using Lark’s Head knots. Make sure the middle 8 cords are longer than the 4 cords on each side.
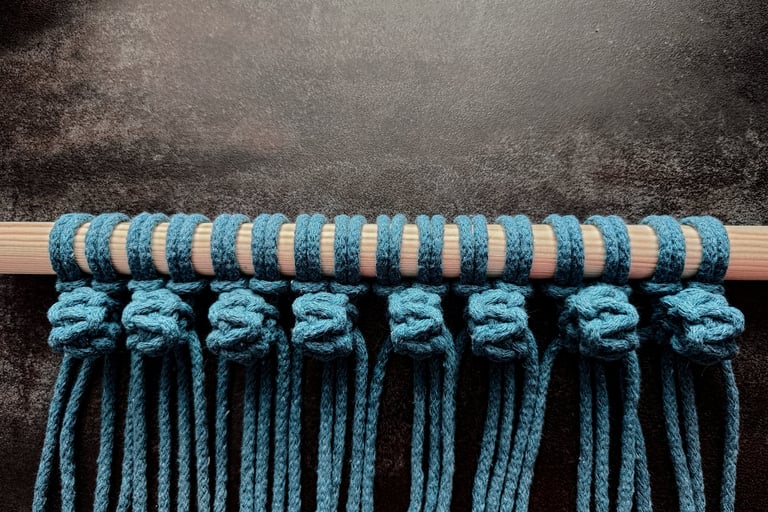
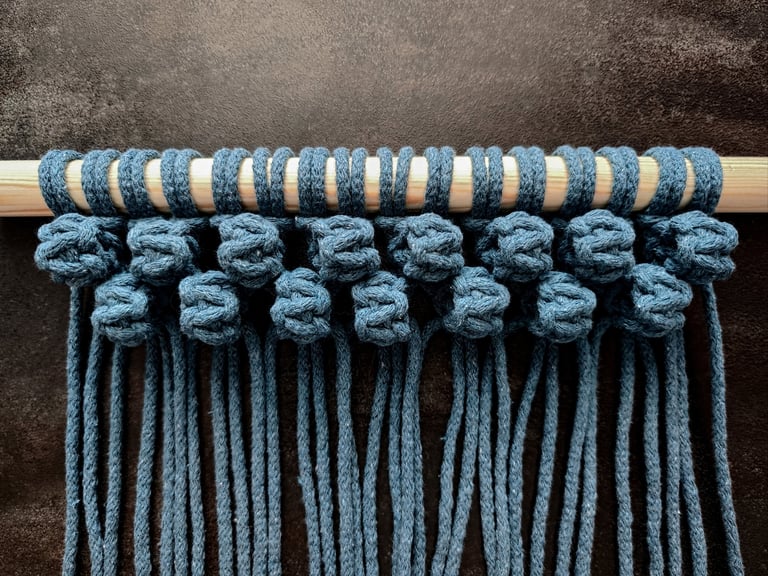
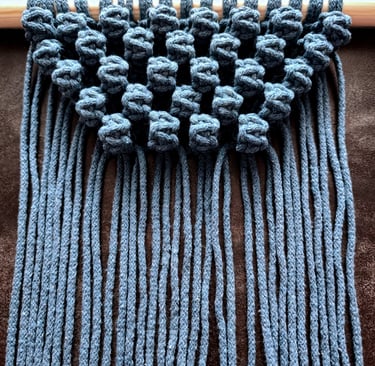
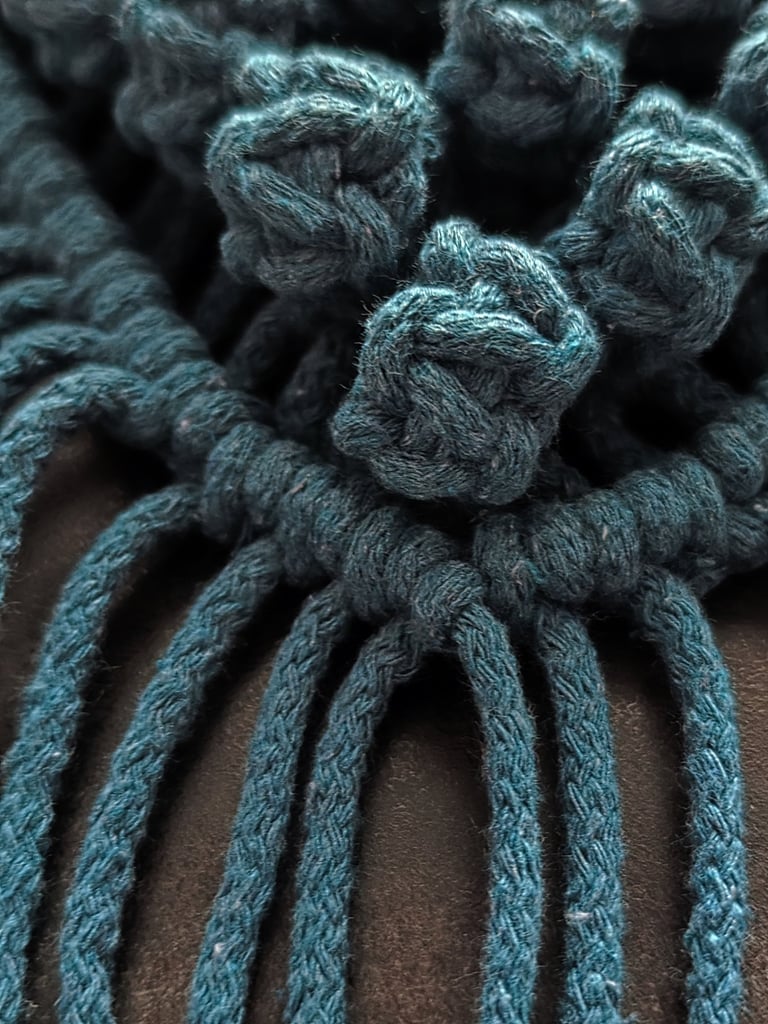
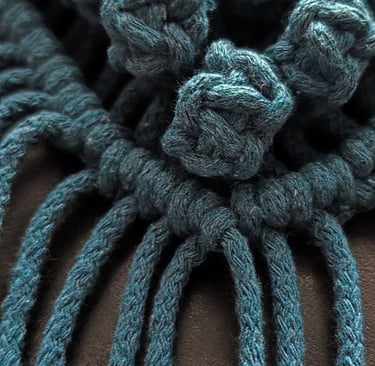
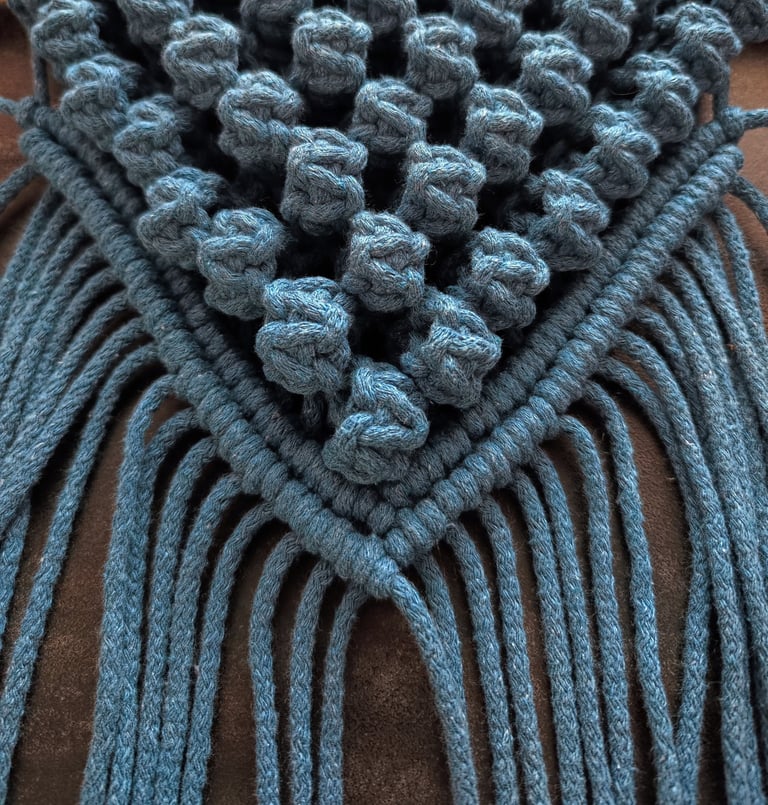
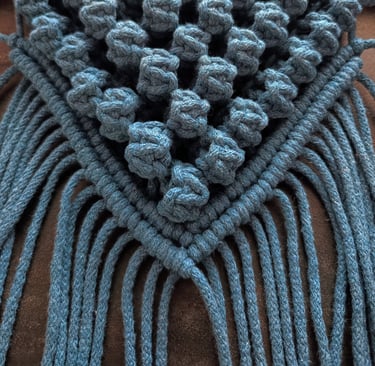
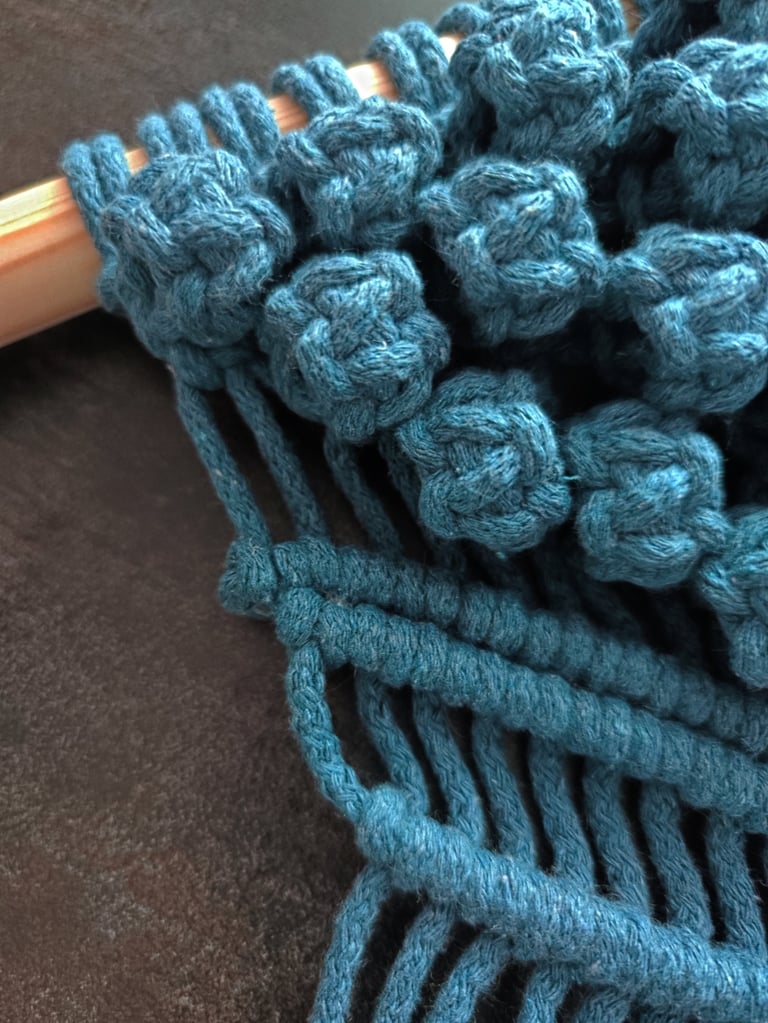
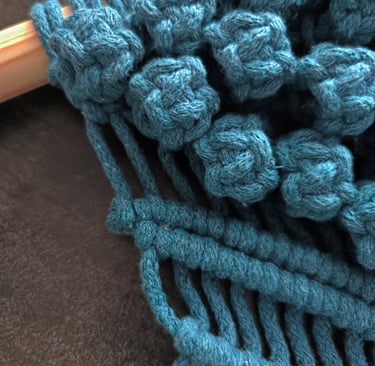
2. MAKE THE FIRST ROW OF BERRY KNOTS
Create a full row of Berry knots by making 8 knots across your work.
3. MAKE THE SECOND ROW OF BERRY KNOTS
For this row, start differently by skipping the first 2 cords. Begin the first Berry knot using the next 4 cords.
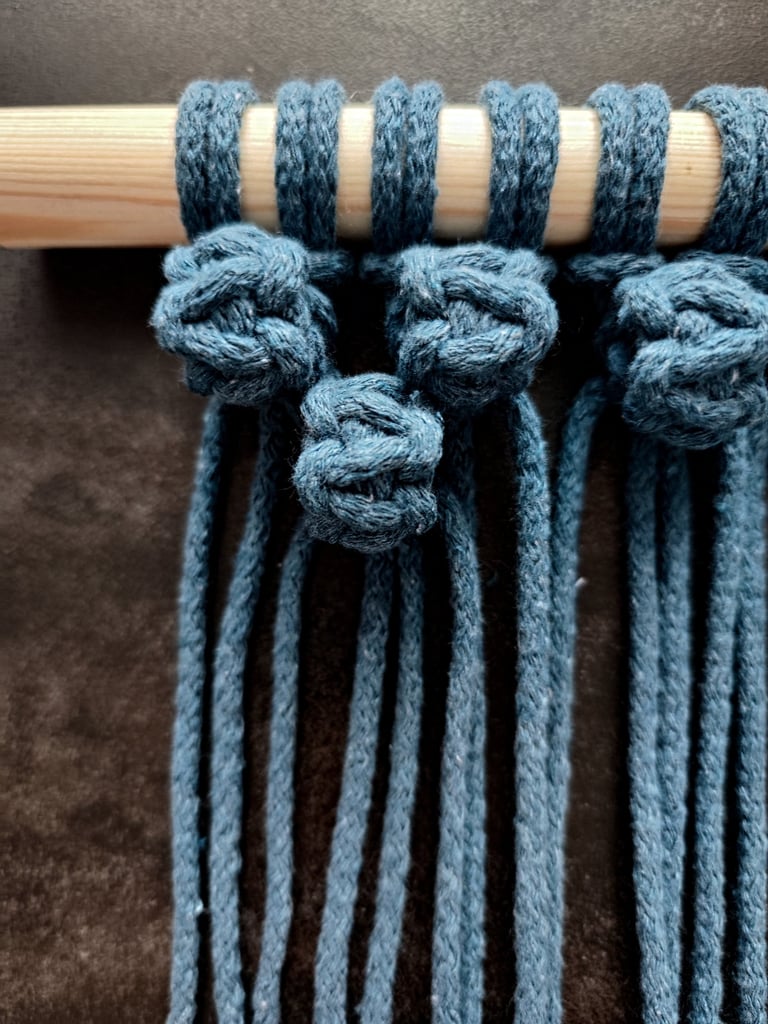
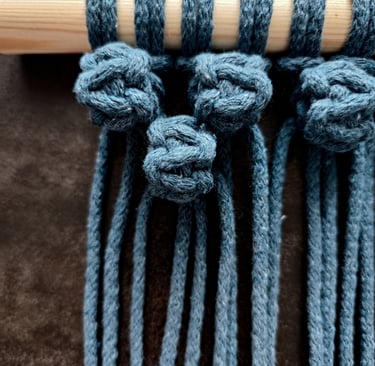
Continue making Berry knots across the row until only 2 cords remain on the right-hand side. Leave these 2 cords aside. You should now have 7 Berry knots in total.
4. MAKE THE THIRD ROW OF BERRY KNOTS
For the third row, skip the first 4 cords, then begin your first Berry knot with the following 4 cords.
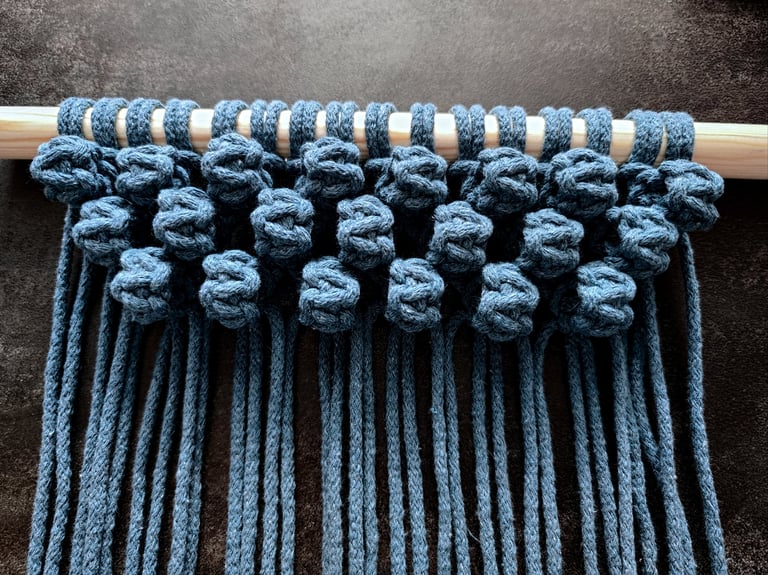
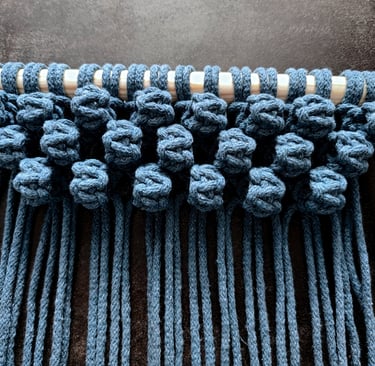
Continue making Berry knots across the row until you have completed 6 knots.
5. MAKE THE FOURTH ROW OF BERRY KNOTS
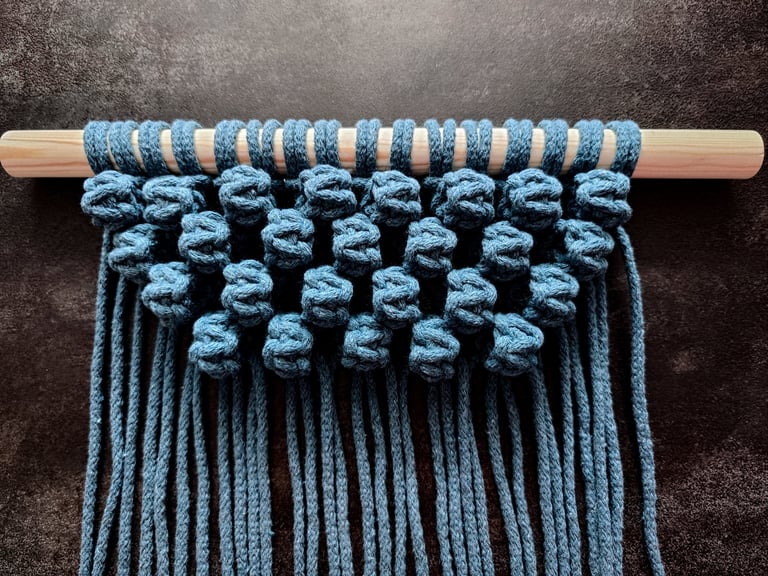
Skip the first 6 cords and start the first Berry knot of the row with the next 4 cords. Continue making Berry knots until you have completed 5 knots, leaving 6 cords unworked on the right-hand side. Then, move on to the next row.
6. MAKE THE FIFTH ROW OF BERRY KNOTS
Skip the first 8 cords and start the first Berry knot with the next 4 cords.
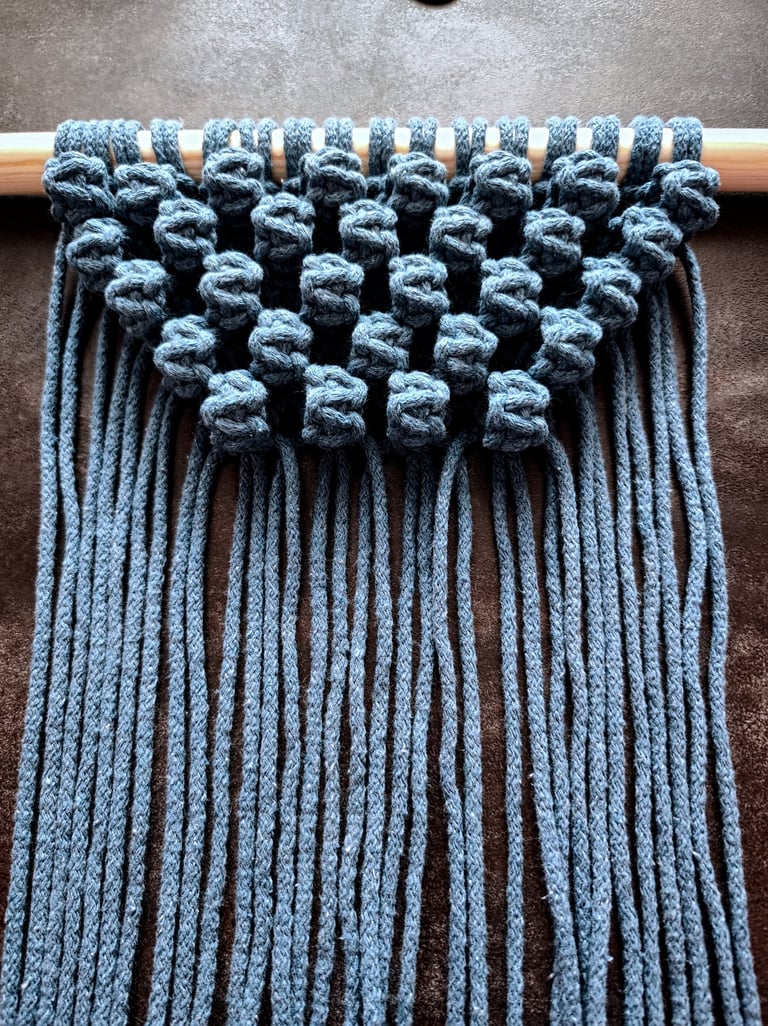
Create 4 Berry knots across the row, then leave the remaining 8 cords on the right-hand side unworked.
7. MAKE THE SIXTH ROW OF BERRY KNOTS
Skip the first 10 cords and start the Berry knot with the next 4 cords.
Create 3 Berry knots across the row, then leave the remaining 10 cords on the other side unworked.
8. MAKE THE SEVENTH ROW OF BERRY KNOTS
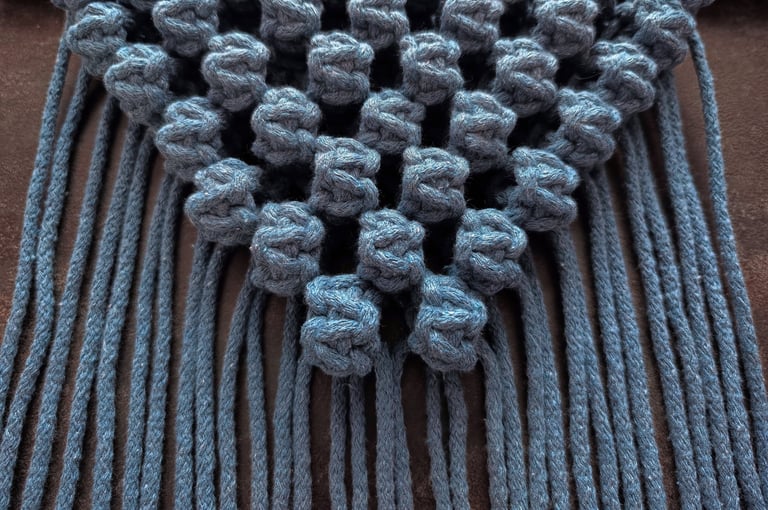
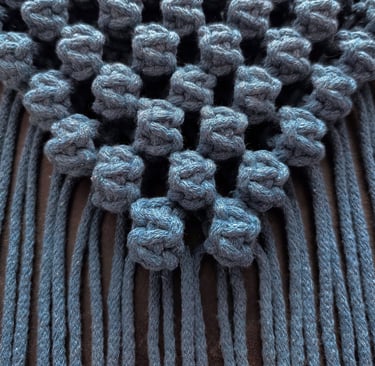
Skip the first 12 cords and begin the first Berry knot of the row with the next 4 cords.
Create 2 Berry knots across the row, then leave the remaining 12 cords untouched.
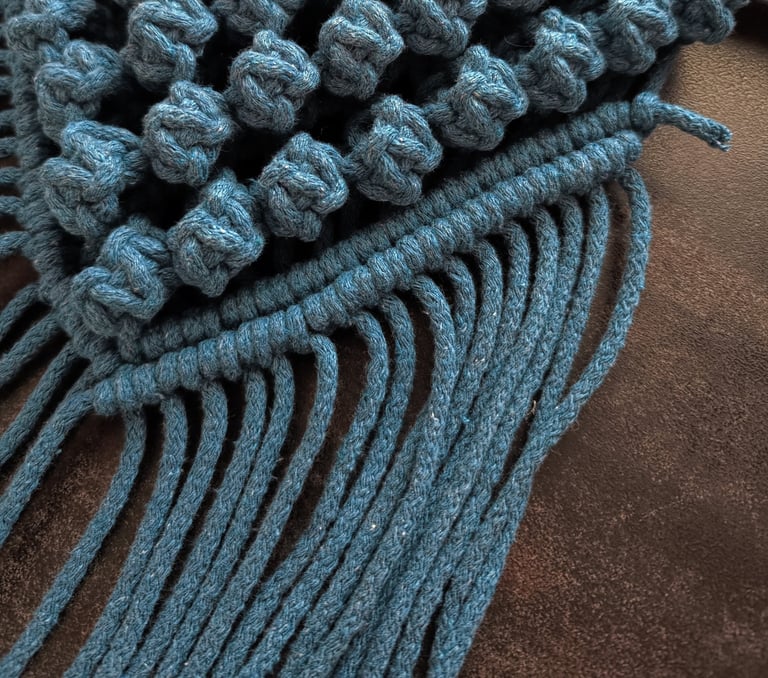
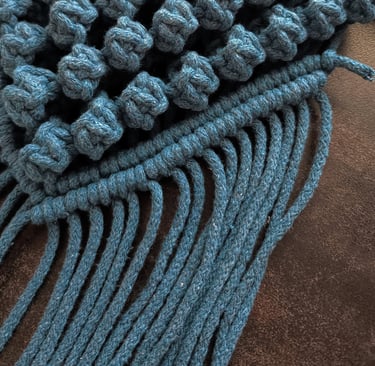
9. MAKE THE EIGHTH AND FINAL ROW OF BERRY KNOTS
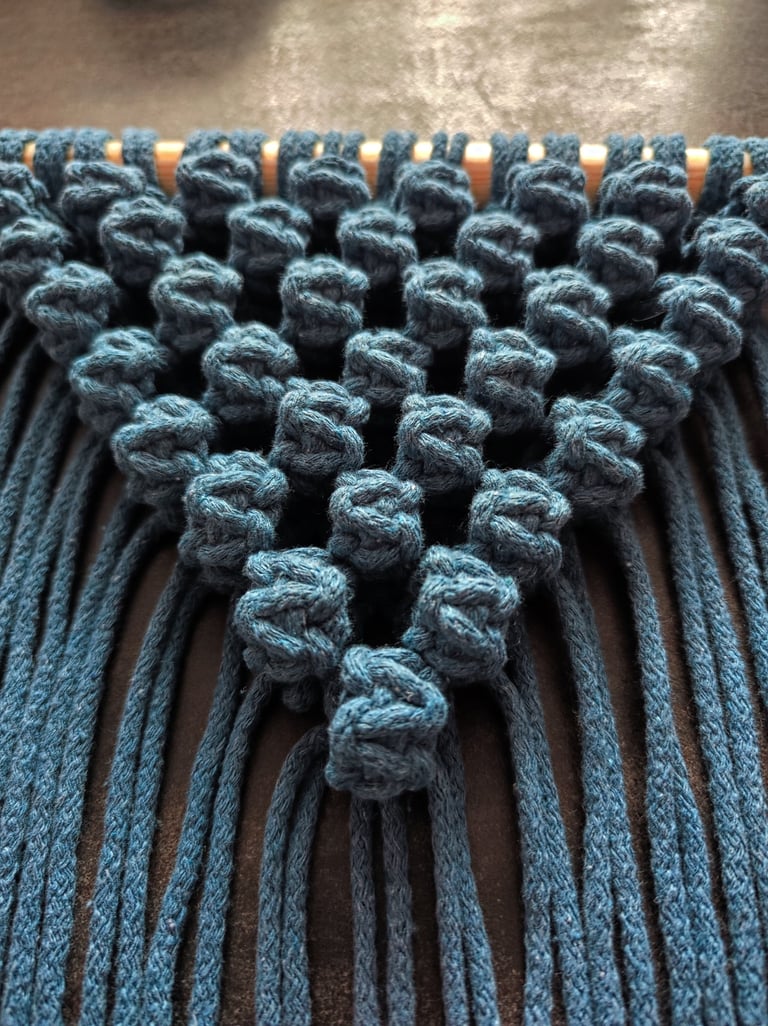

For the final row, create just 1 Berry knot in the center and leave 14 cords untouched on each side.
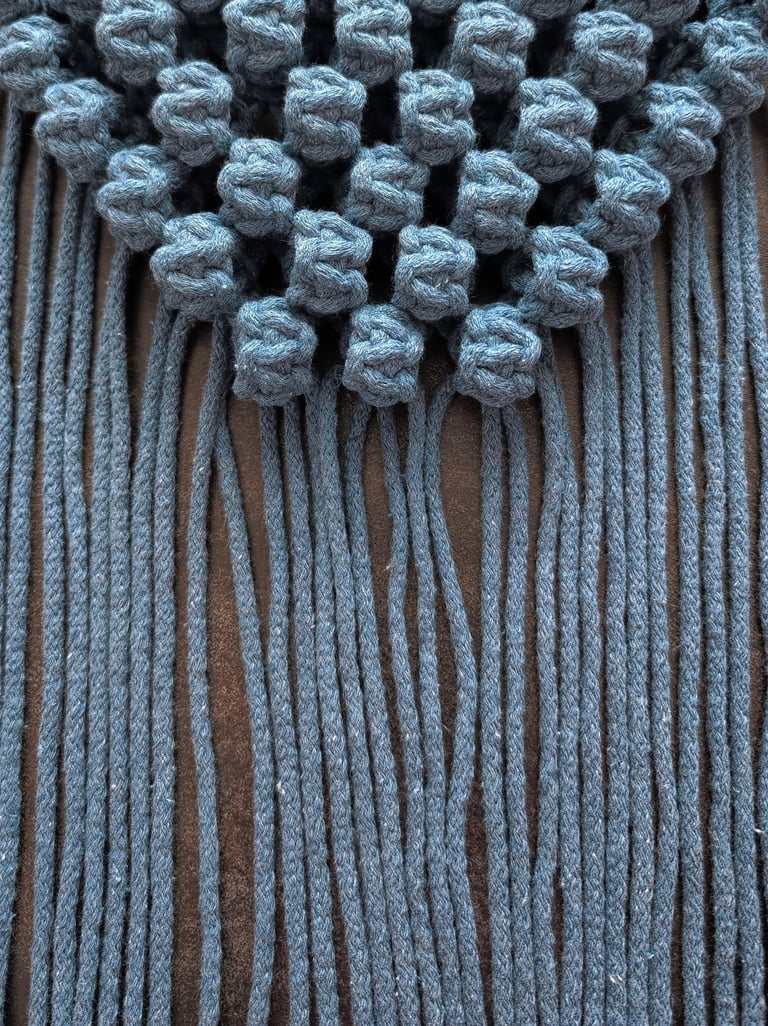
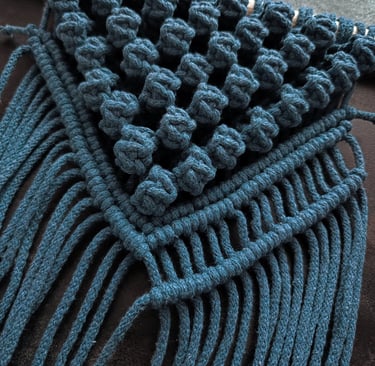
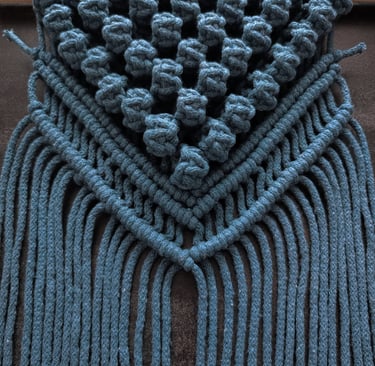
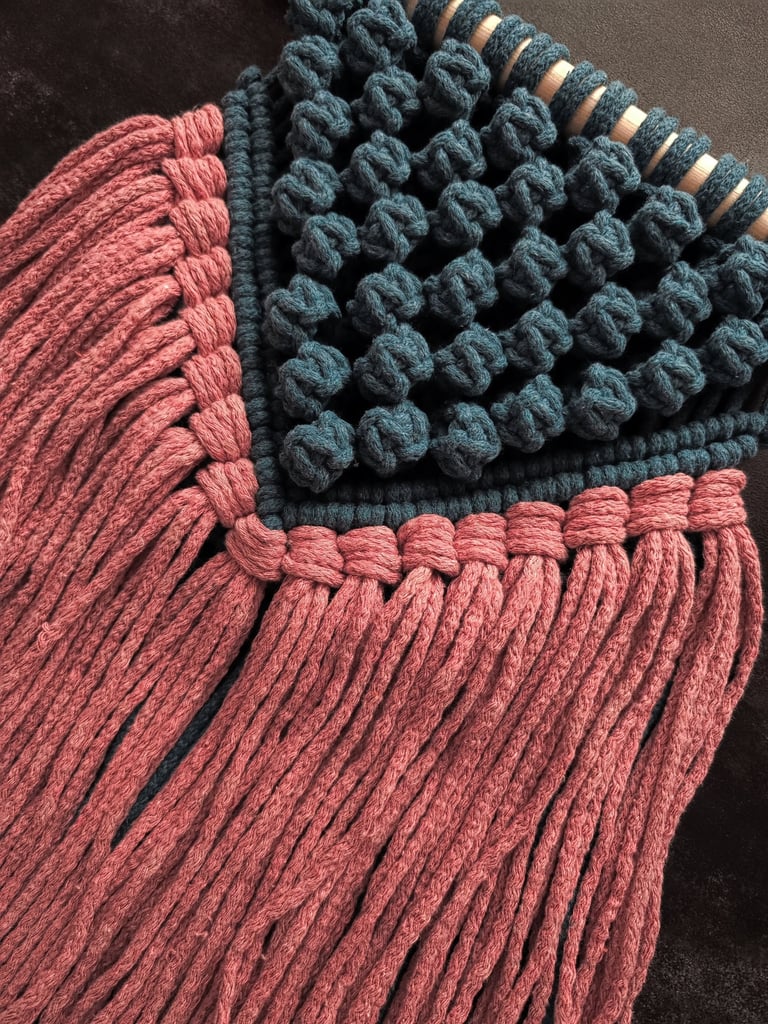
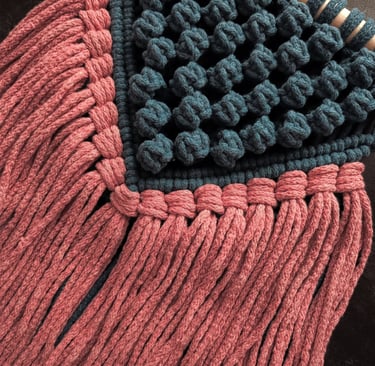
You have successfully completed the Berry knot section of your macramé piece. Congratulations! Now, let’s move on to the next steps.
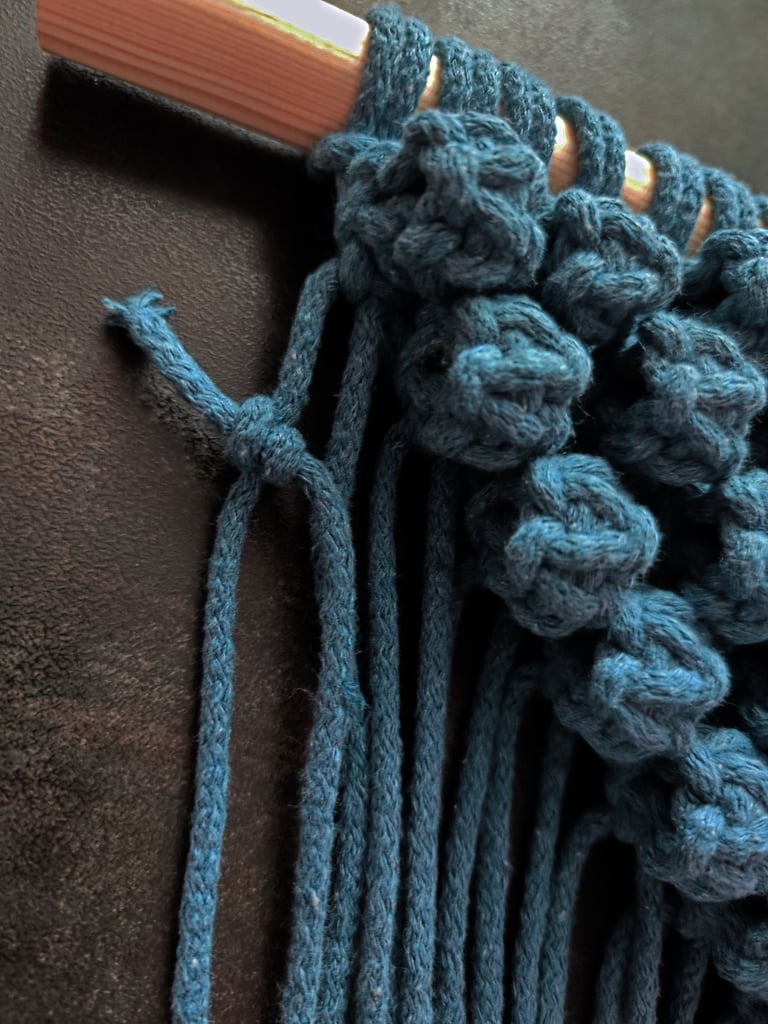
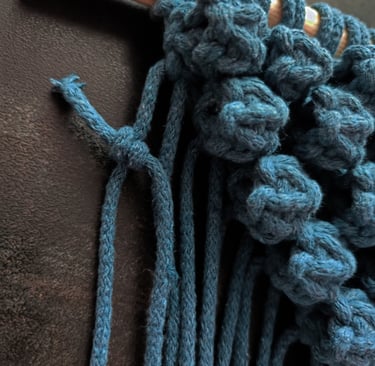
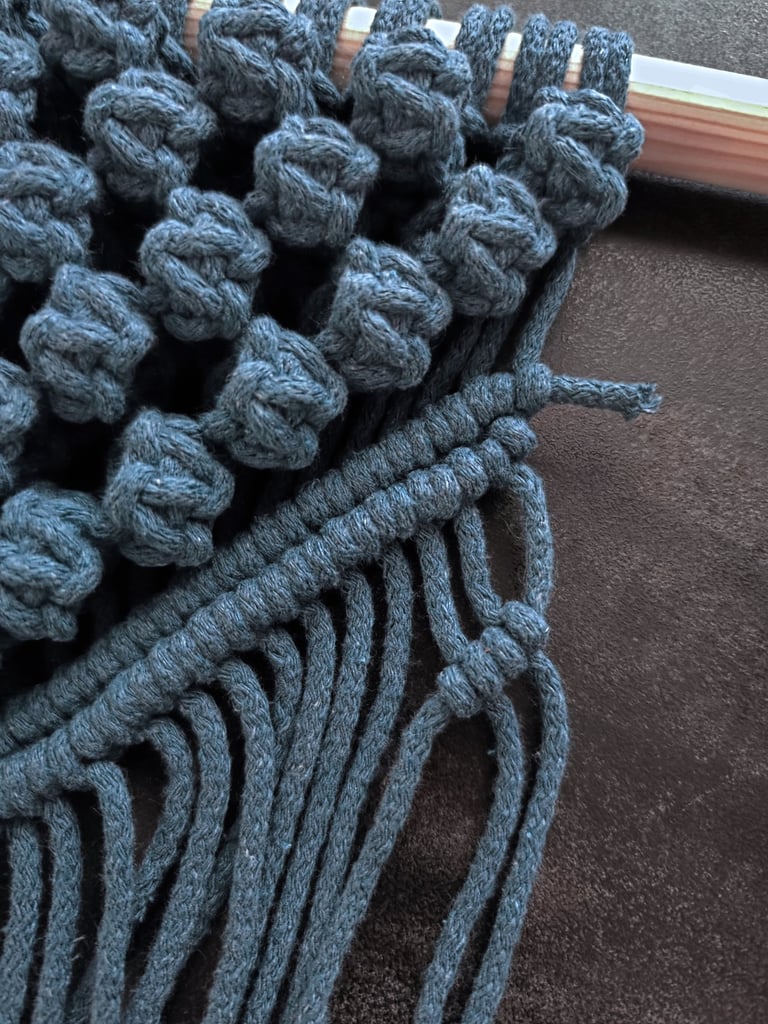
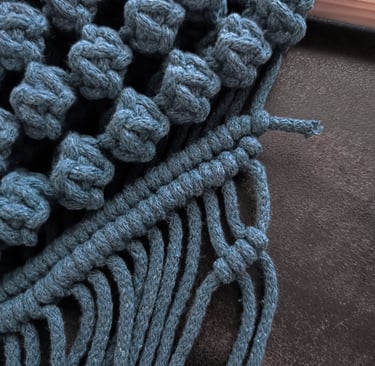
10. ATTACH A NEW CORD ON BOTH SIDES
Attach a new cord on your left-hand side using a Diagonal Double Half-Hitch knot, about 2 cm (0.8”) below the first Berry knot. The new cord should be 100 cm (39.4”) long. Repeat the same on the right-hand side.
11. MAKE A ROW OF DIAGONAL DOUBLE HALF-HITCH KNOTS ON BOTH SIDES
Begin on the right-hand side and work diagonally downward, maintaining a 2 cm (0.8”) gap from the Berry knots. Stop when you reach the center, then repeat the same process on the left side. Finally, finish by crossing the left row over the right one.
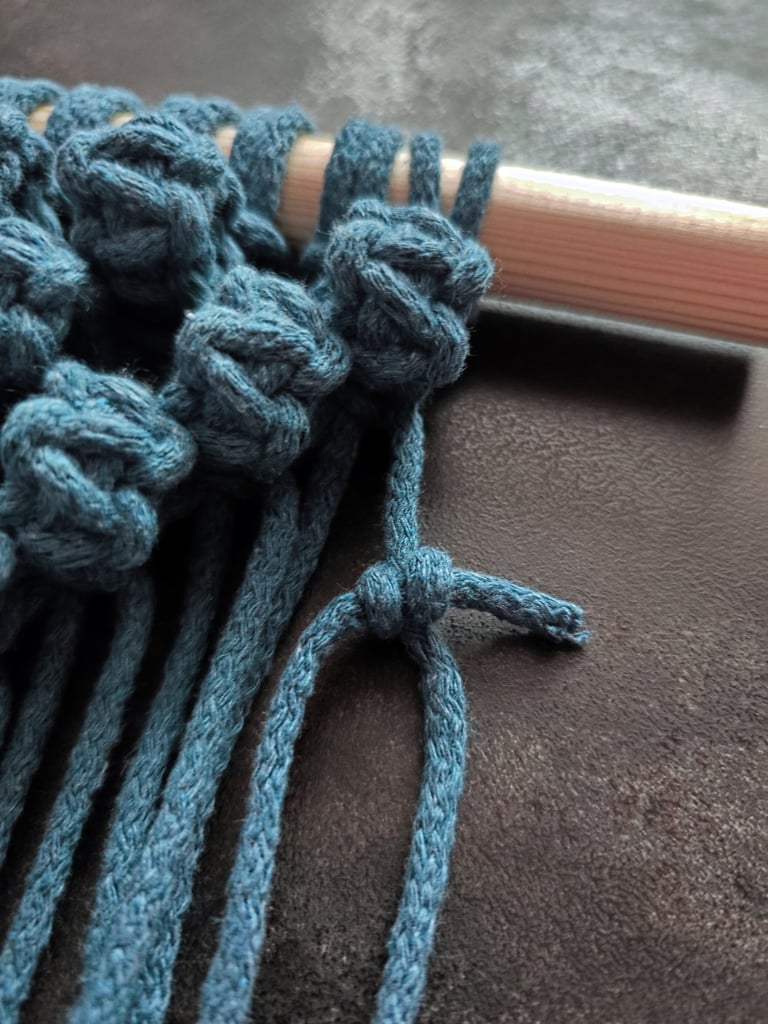
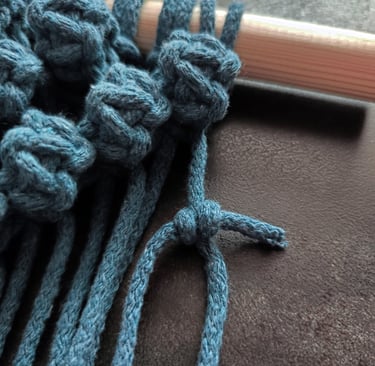
12. MAKE A ROW OF DIAGONAL DOUBLE HALF-HITCH KNOTS ON BOTH SIDES
Repeat the row of Diagonal Double Half-Hitch knots one more time on both sides. Begin on the right-hand side, using the first cord from the right as your anchor cord. Work your way down the line and finish in the middle.
Next, move to the left-hand side and take the first cord from the left as your anchor cord. Create a row of Diagonal Double Half-Hitch knots down the line, using the last cord from the final knot on the right-hand side as the last working cord to finish.
13. MAKE ANOTHER ROW OF DIAGONAL DOUBLE HALF-HITCH KNOTS ON BOTH SIDES WITH A GAP
Create another row of Diagonal Double Half-Hitch knots about 1.5 cm (0.6”) below the previous two rows, working alongside them. This time, instead of attaching a new cord as you did with the first row, start with the first cord from the side you're working on. Leave this gap to allow space for adding tassels between the cords later.
Continue knotting down until you reach the middle of your macramé piece, then stop.
Repeat the same process on the other side.
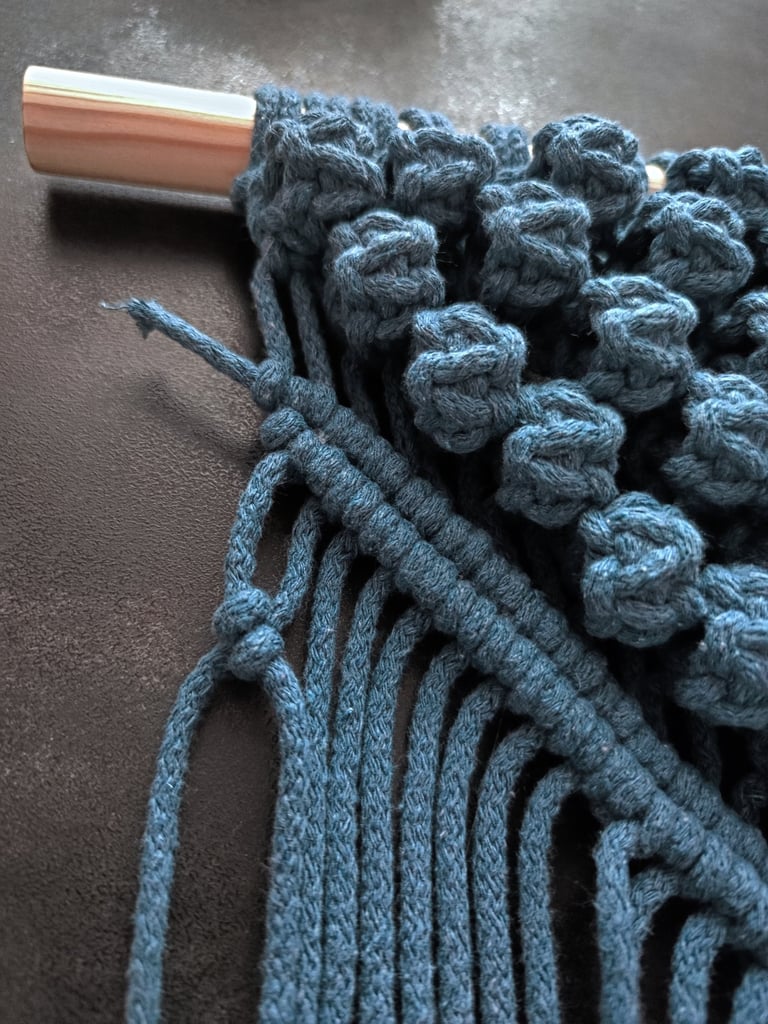
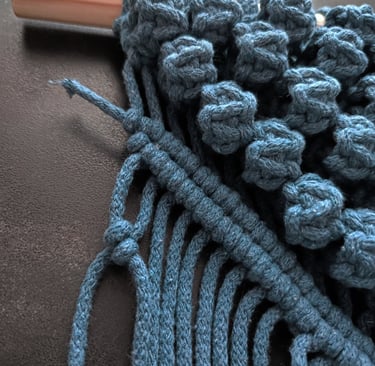
Join the two sides together at the bottom, placing the left side over the right. It doesn’t need to be perfectly aligned, as the pink yarn will cover this area. So don’t worry if it’s a bit wrinkled or uneven—it won’t be visible.
14. ATTACH THE PINK YARN WITH THE RYA KNOT
Take 4 Pink cords and create a Rya knot.
Fold them in half and attach them to your macramé in the gap between the last 2 rows of Diagonal Double Half-Hitch knots.
Wrap the folded half of the Pink cords around the first Blue cord, guiding the ends behind the blue cord, around it, and through the space between the first and second Blue cords.
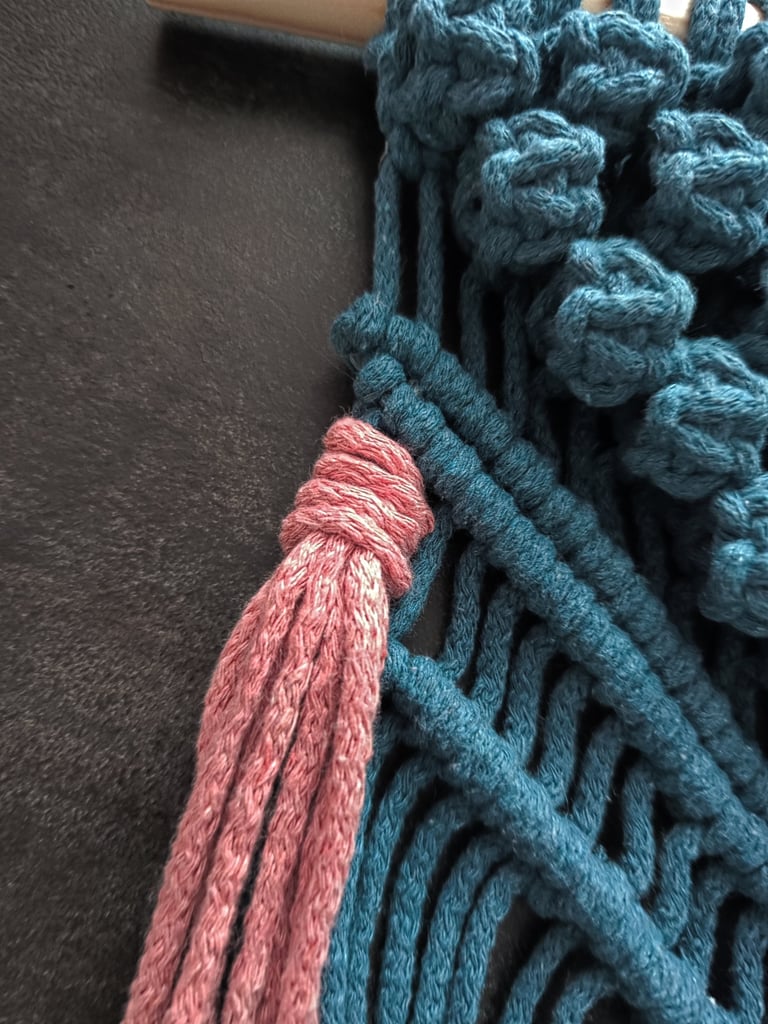
In the end, you will have 17 Rya knots attached to your macramé piece.
If you notice any gaps between the tassels and the upper row of Diagonal Double Half-Hitch knots, you can adjust the lower row by tightening the cords in the middle to close the space.
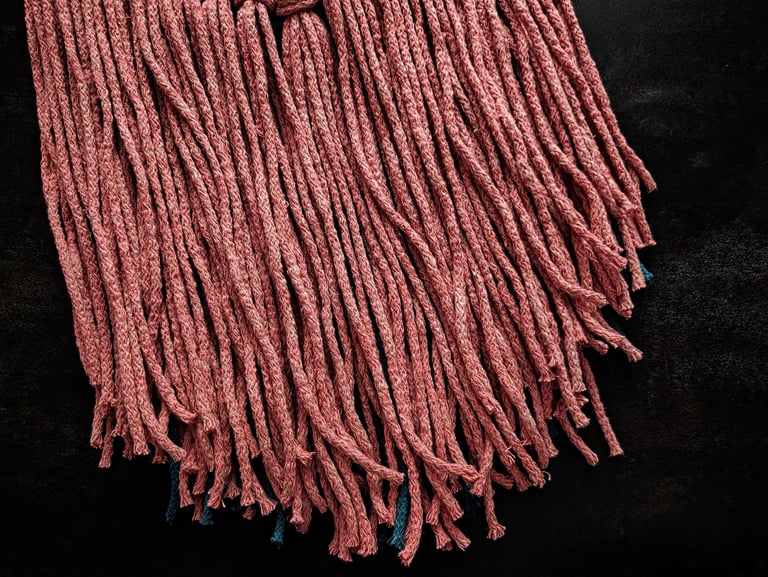
Take your time to make all adjustments until you’re happy with the look—once you start trimming the cords to your desired length and shape, you won’t be able to undo it.
15. TRIM THE ENDS
Use your scissors to carefully trim the excess ends hanging from your macramé piece. Shape the cords to your desired length and form for a polished finish.

16. ATTACH THE HANGING CORD
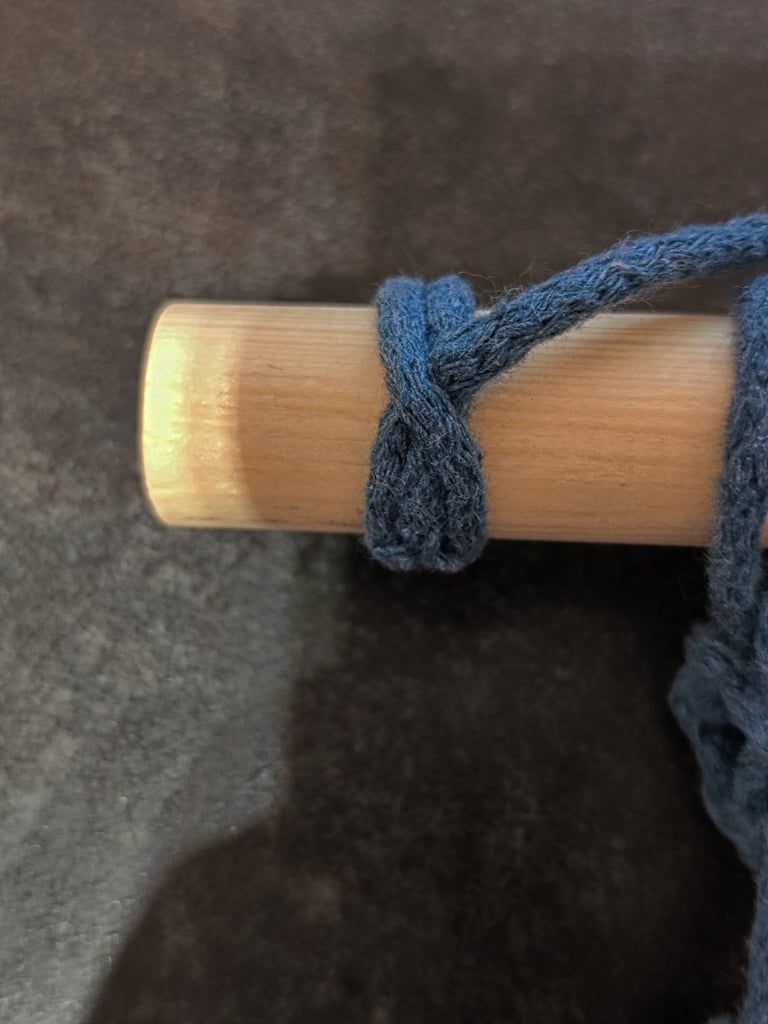
Attaching a yarn hanger to your macramé piece is optional—you can simply hang it on one or two nails if you prefer. However, if you'd like to add a yarn hanger, now is the perfect time.
There are many ways to do this, but I personally recommend using a Constrictor’s knot. After tying the knot, trim the shorter end and secure it to the wooden dowel with a small amount of glue to keep it from coming loose.
17. GLUE THE END OF THE CORD YOU ATTACHED ON THE BACK
Remember the cords you attached for the first row of Diagonal Double Half-Hitch knots? Now, glue their ends to the back of your macramé piece to keep them hidden and give your work a cleaner finish. You can use textile glue or a glue gun for this. Apply a small amount of glue to the back of each cord, press it firmly onto the back of your piece, and hold it in place until secure. If needed, trim the cords shorter before gluing to make attaching them easier.
Macramé yarn in 2 colours or in 1, picker’s choice (braided, 5 mm)
Wooden dowel rod 35 cm (13.8˝)
THE END
You’ve successfully completed your Berry Macramé Wall Hanging—congratulations on your accomplishment! I hope you found the process enjoyable and rewarding. It’s always special to create something with your own hands, and I’m glad you chose this project. Thank you sincerely for your purchase and for trusting me to be part of your creative journey. Wishing you a calm, pleasant day filled with inspiration and joy.