How to Vixie? Make a Rya knot?
Discover the technique of the Rya knot in this comprehensive macrame tutorial. Designed for both intermediate and advanced crafters, this guide provides clear, step-by-step instructions to help you master this fundamental knot. Learn how to incorporate the Rya knot to add texture and depth to your macrame projects, enhancing both their visual appeal and structural integrity. Elevate your craftsmanship with precise techniques and professional insights that will refine your skills and expand your creative possibilities.
KNOTS TUTORIALS
Vixie Macrame
6/22/20254 min read
The Rya knot is a versatile macramé technique used to add textured fringe to your projects, enhancing both depth and visual interest. It involves tying strands of yarn or rope onto your base cords, creating a fluffy, layered effect that can be customized in length and density.
Using Rya knots in your macramé allows you to experiment with different patterns and styles, making your pieces stand out. Learning this knot can elevate simple wall hangings, plant hangers, or other woven designs by giving them a tactile, decorative finish.
This tutorial will guide you through the steps to master the Rya knot, ensuring your knots are secure and evenly spaced. You’ll discover tips on preparing your yarn, attaching knots, and maintaining consistent volume for professional-looking results.
Understanding the Rya knot
The Rya knot is a distinctive technique that adds texture and volume to your macrame projects. Knowing its background, unique features, and practical applications will help you incorporate this knot effectively.
Definition and Origins
The Rya knot originated in Scandinavia as a traditional rug-making technique. It involved tying short pieces of yarn into a base fabric to create a dense, shaggy surface known for warmth and softness.
In your weaving or macrame, the Rya knot involves looping and securing strands to form a fringe or pile that stands out from the base. This knot is tied around warp threads, creating a tufted effect.
Though it began in textile arts for rugs, you can now use the Rya knot in macrame to add texture or fringe without complex steps.
Characteristics of the Rya knot
The Rya knot forms a dense, shaggy pile that can vary in length depending on your preference. You tie multiple strands around paired warp threads, which produces a looped fringe.
A key characteristic is the knot’s volume. Slightly loosening the knot after tying makes the strands more prominent and helps cover gaps in your weave. This creates a fuller, more visible pile.
Most projects support the knot with plain weave rows above and below. This stabilizes the base and keeps knots secure and evenly spaced.
Common Uses in Macrame
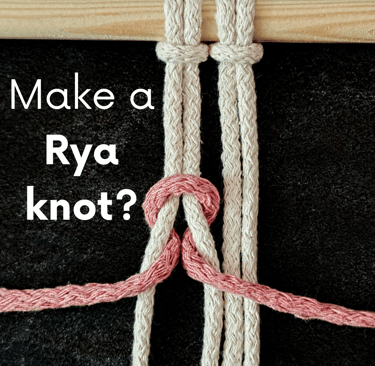
Step-By-Step Rya knot Macrame Tutorial
You can use Rya knots primarily for creating fringes or textured surface areas in your macrame work. They add dimension to wall hangings, plant hangers, or decorative panels.
By alternating rows of knots and offsetting them, you create dense, plush sections that catch the eye. This technique lets you control how thick or sparse the fringe appears.
Fringe length varies from 1 to several centimeters (inches), depending on the effect you want. Many macrame artists use Rya knots to blend softness with structure in their designs.
To create tidy Rya knots, you’ll need a clean workspace, precise cord measurements, and clear steps to tie each knot correctly. Once tied, securing and arranging the knots evenly is essential to maintain the fringe’s uniform look.
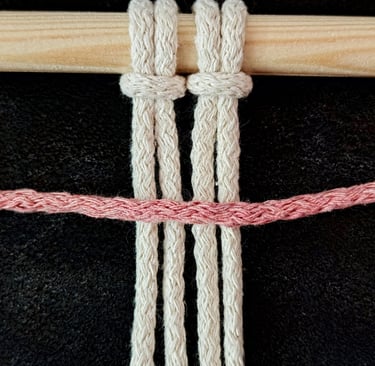
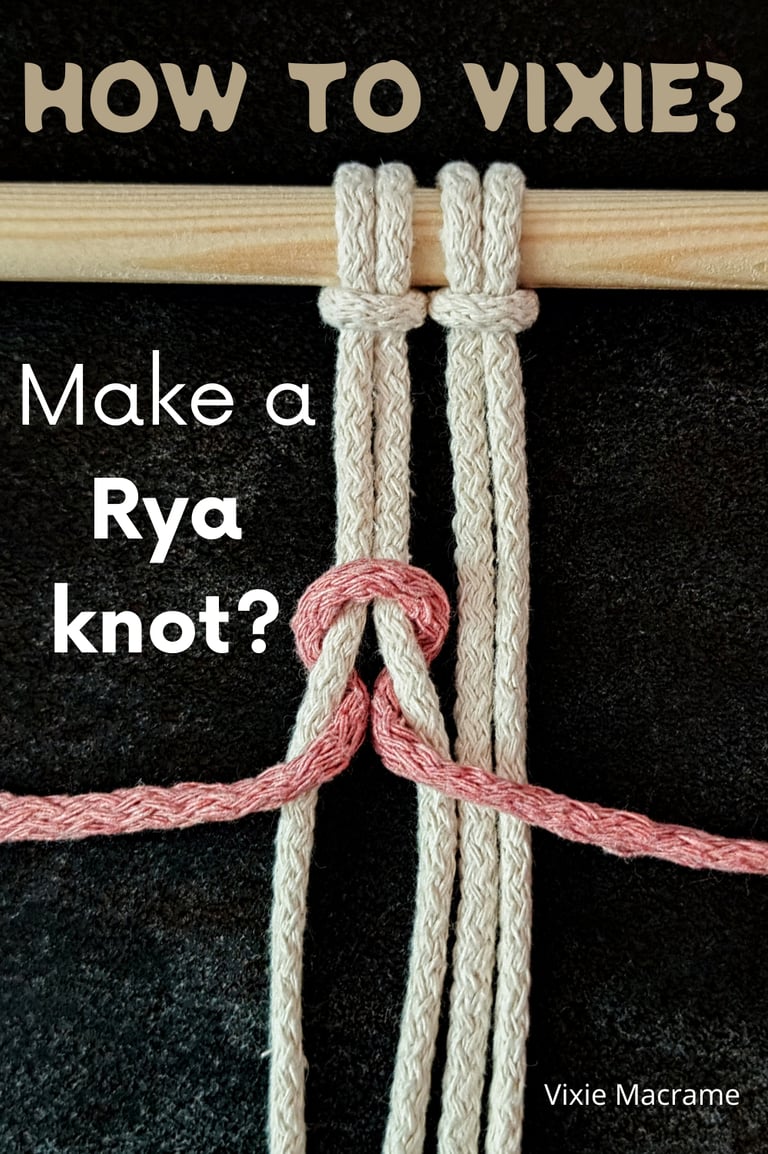
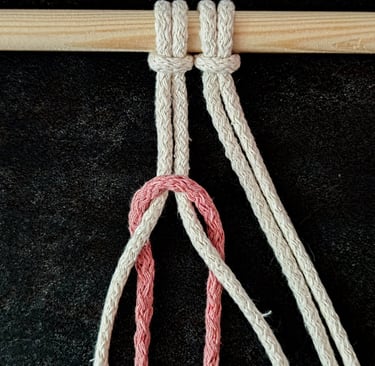
STEP 1
Fold the working cord (pink) in half and place the midpoint across the anchor cords (white).
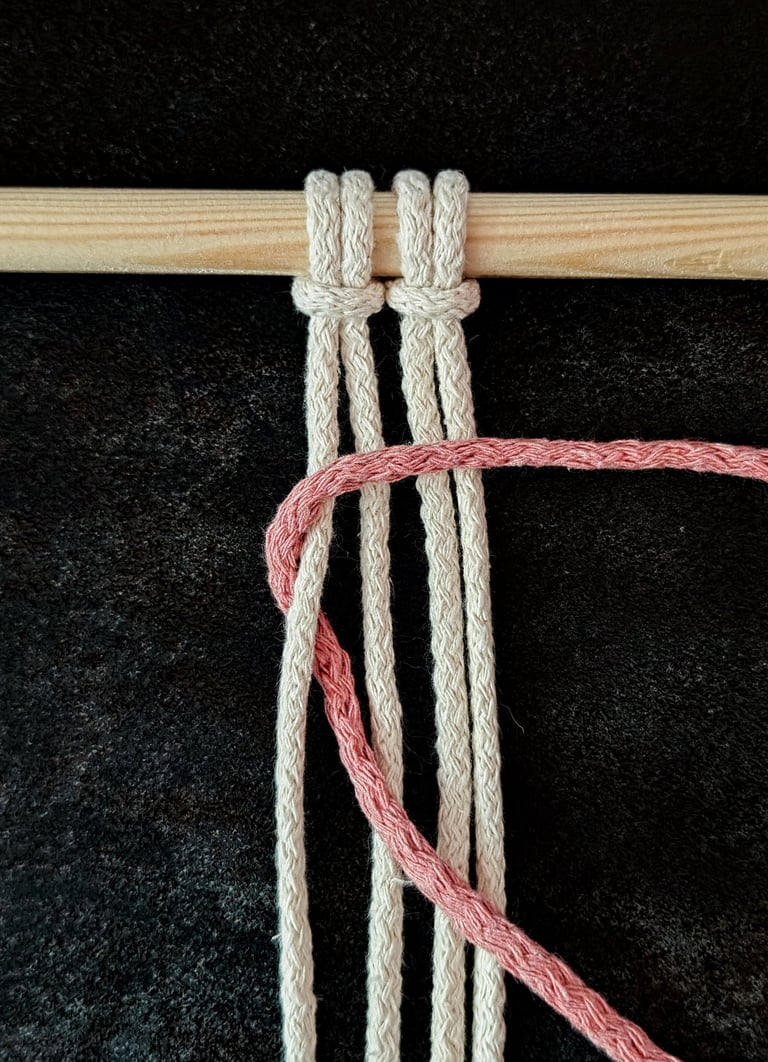
STEP 2
Take the left tail of the working cord (pink) and wrap it underneath and around the left anchor cord (white), threading it from the back to the front through the space between the 2 cords.
This step can be a bit tricky, so hold the top of the loop firmly against the left cord with one hand to keep it secure, while you use your other hand to guide the tail into position.
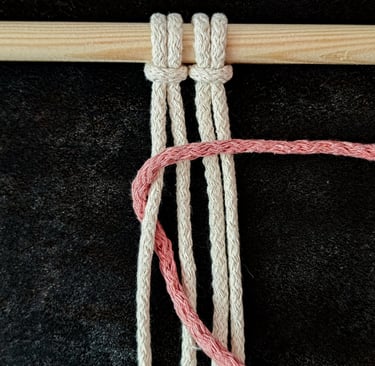
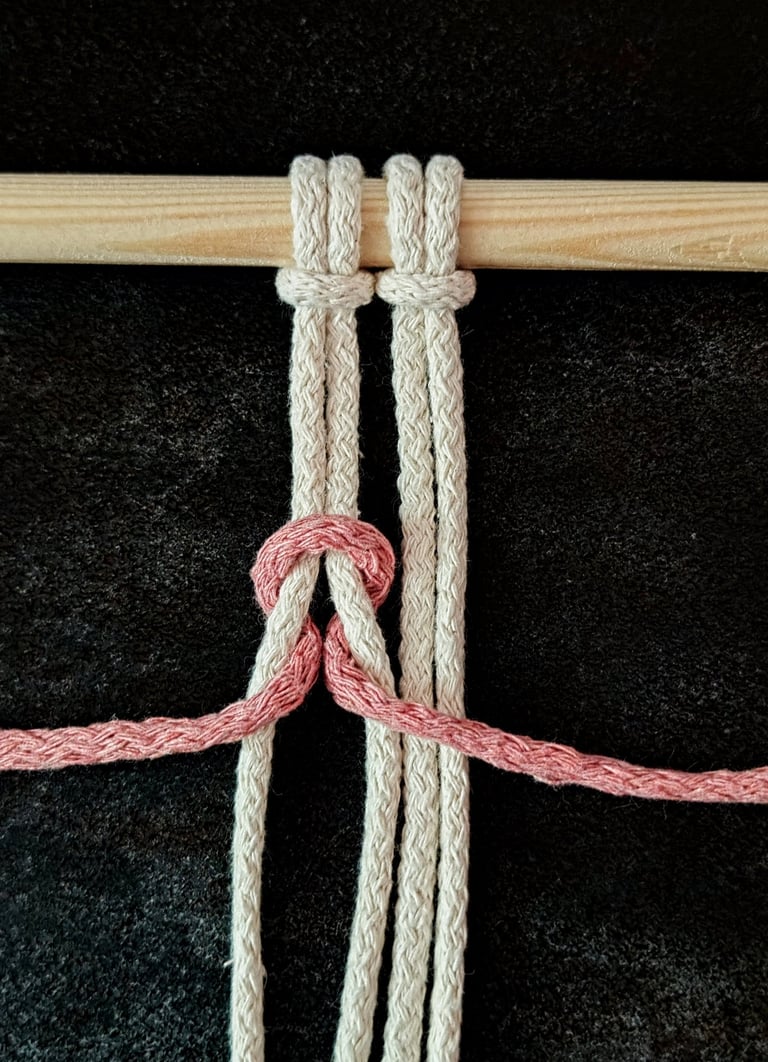
STEP 3
Repeat the same process on the right side by bringing the right tail (pink) behind and around the right anchor cord (white).
Use one hand to hold the loop securely in place while guiding the tail through with your other hand.
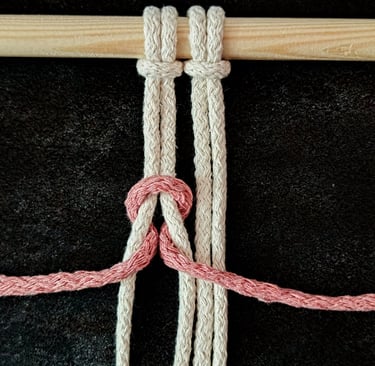
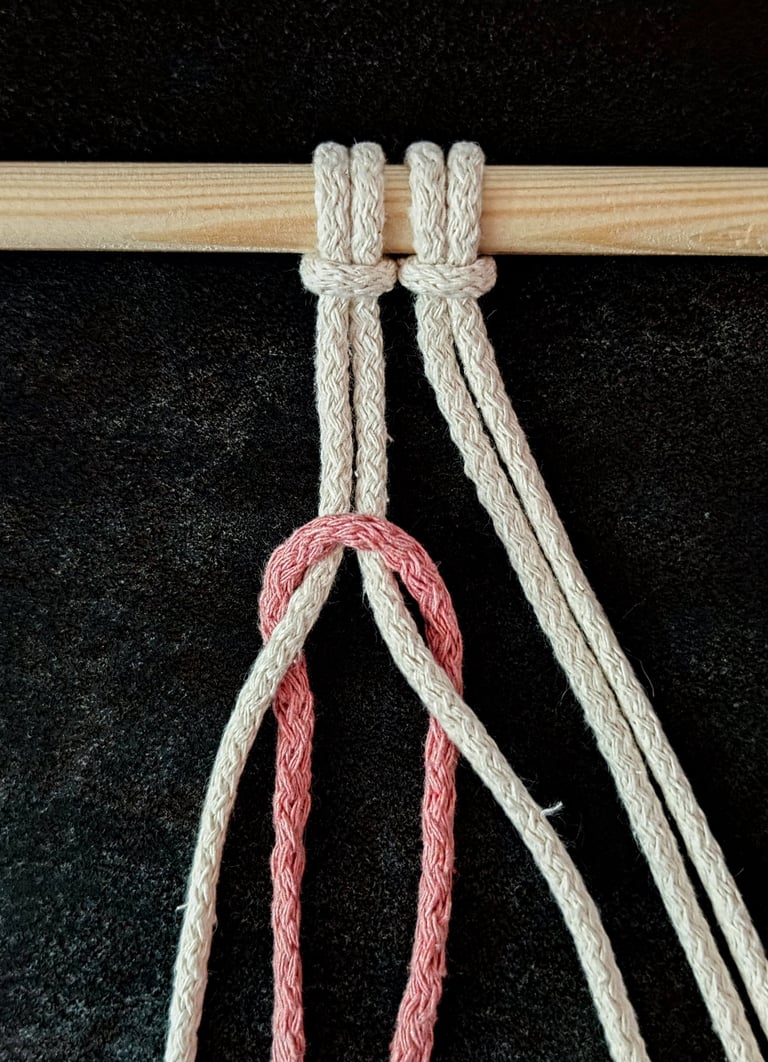
STEP 4
Pull both tails firmly together to tighten the knot securely.
Securing and Arranging knots
Once tied, adjust each knot by sliding it slightly to make them evenly spaced.
Trim the fringe ends to your desired length, keeping them straight or angled as preferred.
Optionally, comb or brush the fringe to fluff it and create texture.
Tie a row of Double Half-Hitch knots or Square Knots above your Rya knots to secure and lock them in place firmly.
Regularly check the tension and alignment to maintain neatness as you work across your project.
Tips for Perfecting Your Technique
Mastering the Rya knot requires careful attention to the details that affect the knot’s appearance and stability. Controlling tension and addressing common mistakes can greatly improve the overall look and durability of your project.
Troubleshooting Common Issues
If your Rya knots look uneven or sparse, check if the yarn pieces are cut to consistent lengths. Using multiple strands helps create a fuller, more uniform knot.
Loose knots often result from insufficient support. Weave a couple of rows of plain weave above and below your Rya knots to lock the warp threads firmly in place. This prevents gaps and shifting.
Uneven knots may also be caused by inconsistent yarn tension or skipping warp threads. Make sure to knot on every appropriate warp thread and adjust your grip to maintain control.
Loosening the Rya knots slightly after tying can add volume and cover gaps more effectively, improving the overall texture.
Achieving Even Tension
Maintaining consistent tension is crucial for neat Rya knots. Tighten each knot with steady pressure, avoiding pulling too hard, which can distort the warp threads.
Use your fingers to guide yarn placement as you tie to keep knots aligned. This helps keep the fringe uniform in height and density.
Work in small sections, checking frequently to ensure knots remain even. Adjust any that appear too loose or tight immediately.
Building a stable foundation by weaving 2 rows of plain weave before and after your Rya knots helps maintain the structure and assists in keeping consistent tension throughout your project.