
How to Vixie? Make a Cat Paw?
Looking to add a fun and cute touch to your macrame projects? In this easy-to-follow tutorial, I’ll show you how to make an adorable cat paw using simple knots and materials you probably already have at home. Perfect for beginners and craft lovers alike, this step-by-step guide breaks down the process into friendly, manageable steps so you can create a charming little paw that’s perfect for decorating your space or gifting to a fellow cat fan. Grab your cords, and let’s get crafting together!
SHAPES TUTORIAL
Vixie Macrame
7/4/20257 min read
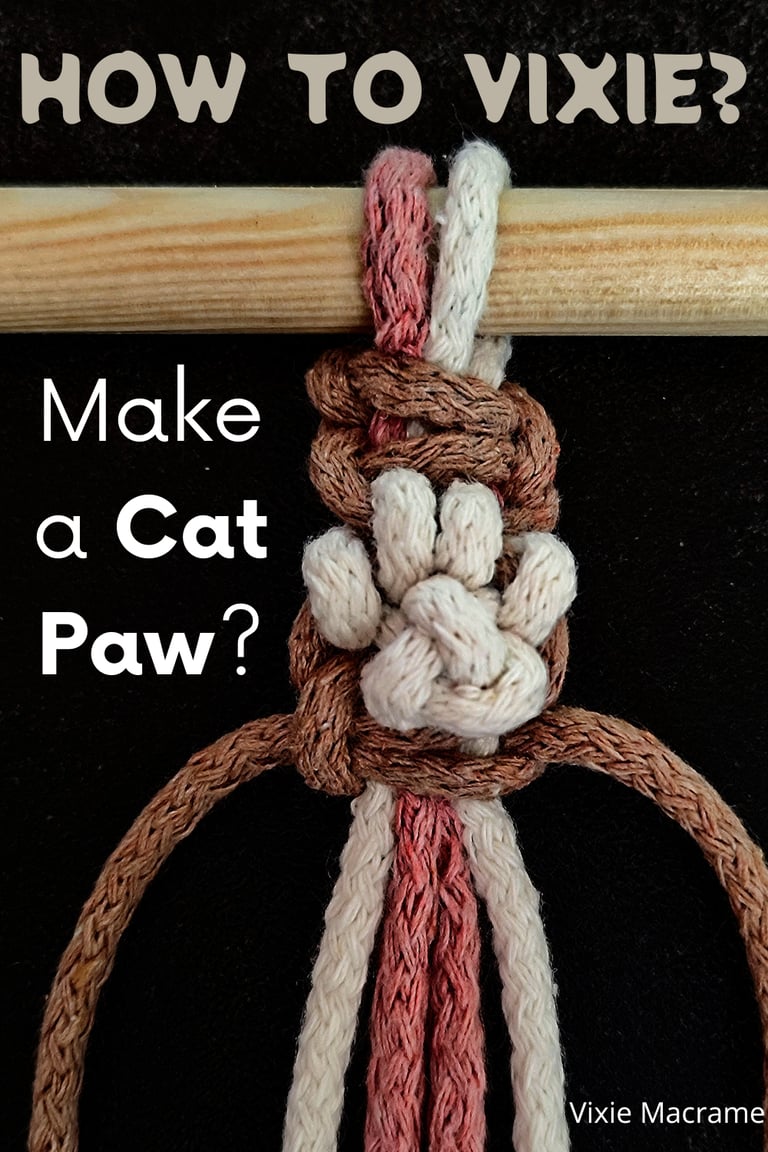
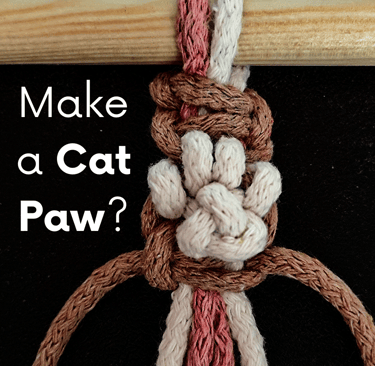
Making a Cat Paw knot in macrame is a straightforward process that adds a charming touch to your projects. To create this knot, you carefully loop and weave cords to form a shape resembling a Cat’s paw, combining simple knots in a specific pattern. This technique works well for beginners looking to add a cute and unique detail to their crafts.
Once you master this knot, you can use it in various projects, from keychains and jewelry to home decor pieces. Learning this knot enhances your ability to personalize and diversify your macrame creations.
Materials and Tools Needed
To create a Cat Paw macrame knot, you’ll need specific cords and tools that support control and precision. Choosing the right size, material, and color of cord will affect the appearance and durability of your piece.
Selecting quality supplies ensures your work holds well and looks clean. Consider your project’s scale to match cord thickness and colors appropriately.
Macrame Cord Choices
You need cords that are strong yet flexible. Cotton cords are the most common because they knot easily and have a soft texture. They come in twisted or braided forms, with braided cords generally holding tighter knots.
Look for cords labeled as macrame or craft cord, typically made from 3-5 mm thickness, for manageable knots.
Avoid slippery or synthetic cords like nylon unless you want a shiny look but be prepared for looser knots. Natural fibers like jute or hemp can add a rustic style but are rougher to work with.
Essential Supplies
The essentials include your macrame cord of choice and a sturdy holding tool like a wooden dowel, metal ring, or sturdy stick to anchor your project.
You will also need basic scissors—sharp enough to cut clean ends without fraying. A measuring tape or ruler helps maintain even lengths.
Optional tools include a tape or clipboard to secure cords while tying and a small comb to neaten fringe or loose ends after finishing your knot.
Recommended Size and Colors
For a beginner-friendly Cat Paw macrame knot, start with cords about 3-5 mm thick. Thinner cords make smaller, delicate knots, while thicker cords offer more texture but are bulkier.
Choose colors that reflect the design you want: natural beige or off-white simulate real cat paws subtly, while soft pastels can add a cute, decorative touch.
Keep the palette limited to up to 3 colors for a balanced look.
Tips for Beginners
Keep your cords organized to avoid tangling, especially when working with multiple strands.
Use a sturdy base like a wooden dowel or ring to attach your macrame cords. This provides stability while you work.
Work in a well-lit area and frequently check your knotting to catch mistakes early.
Practice each knot slowly at first; speed comes with familiarity. Use smooth, natural fibers to make knotting easier.
Patience is key—you’ll find that repetition improves your hand control and knot accuracy over time.
Ensuring Knot Consistency
Consistency in knot tension is vital; uneven knots disrupt your pattern’s smooth lines.
Hold the working cord firmly but avoid pulling too tight—this can distort the shape. Aim for steady, moderate tension with every knot.
Check your progress often against a reference to maintain symmetry, especially in designs like a cat paw where balance matters.
If you notice variations, gently loosen tighter knots and tighten looser ones before moving forward.
Using the same cord thickness throughout helps keep the design uniform and neat.
Step-By-Step Macrame Cat Paw Tutorial
This tutorial guides you through creating the Paw shape with correct knots, and finishing your work securely for durability. Each part is essential for a clean and lasting macrame Cat Paw.
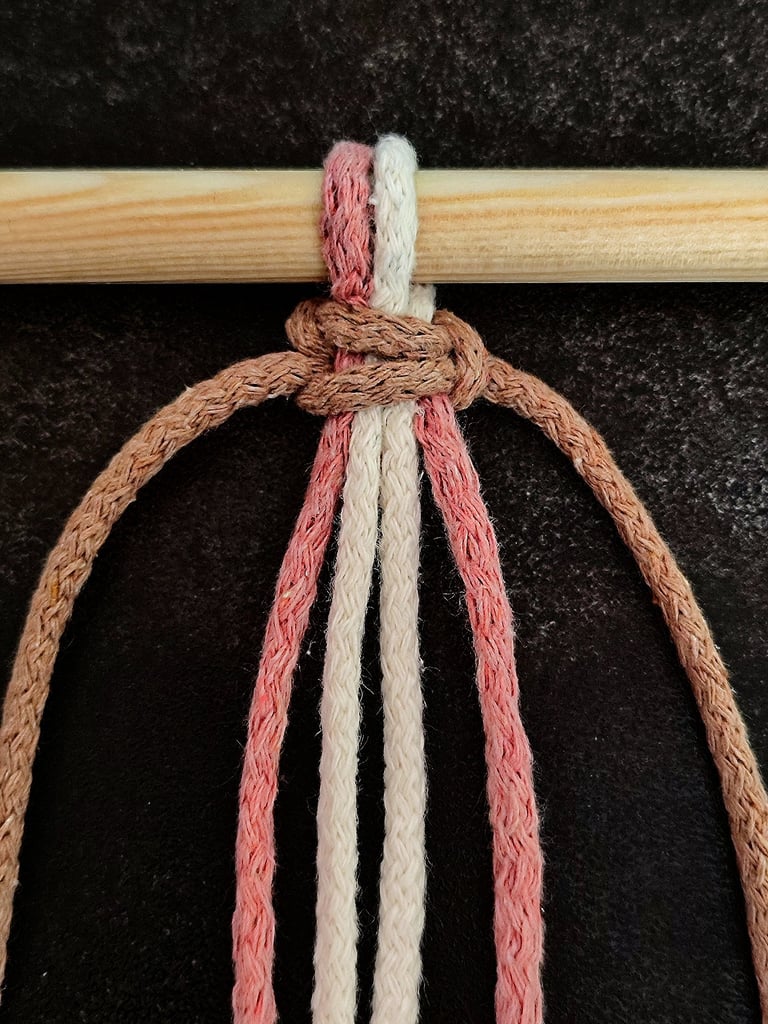
STEP 1
Select a starting point of your preference.
I attached 2 cords to the wooden dowel rod by tying a Square knot with a 3rd cord.
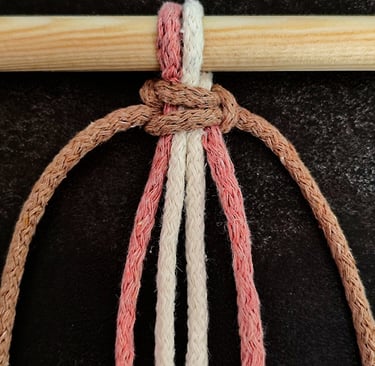
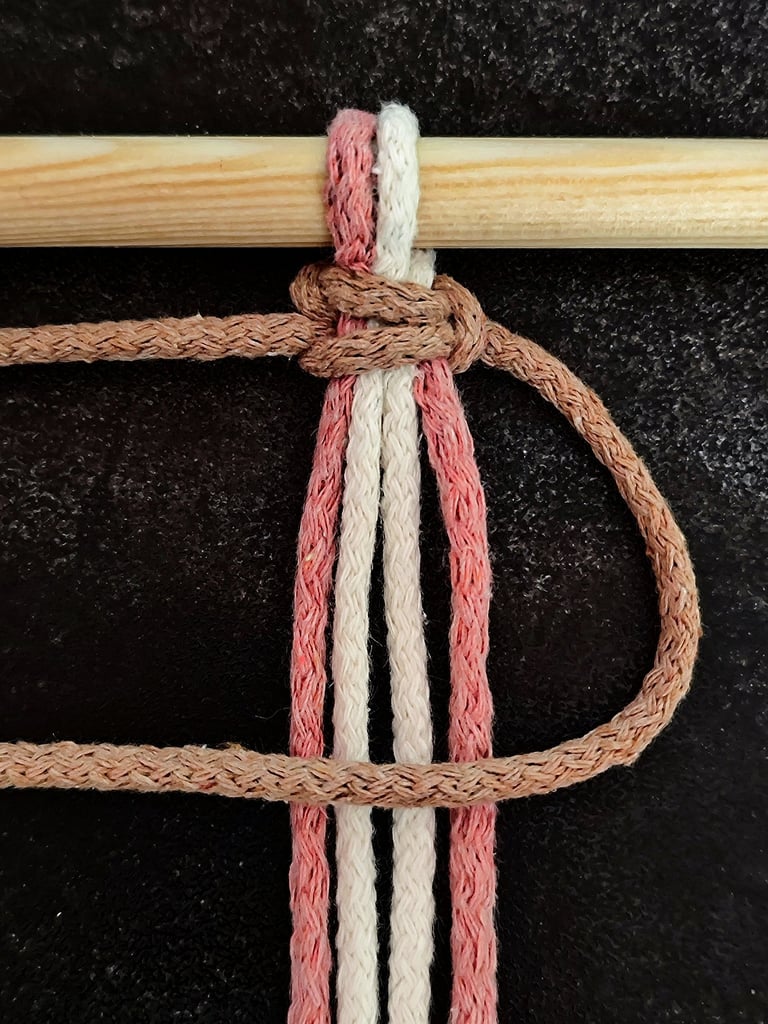
STEP 2
Fold both first cords (Brown) inward on each side—first fold the right cord, then fold the left cord over it.
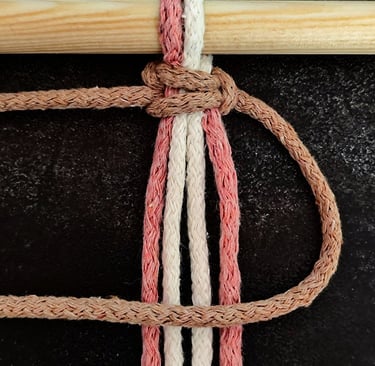
STEP 3
Pull the inner left cord (Brown) up, across, and back down through the loop on the left side.
STEP 4
Pull the inner right cord (Brown) up, across, and back down through the loop on the right side.
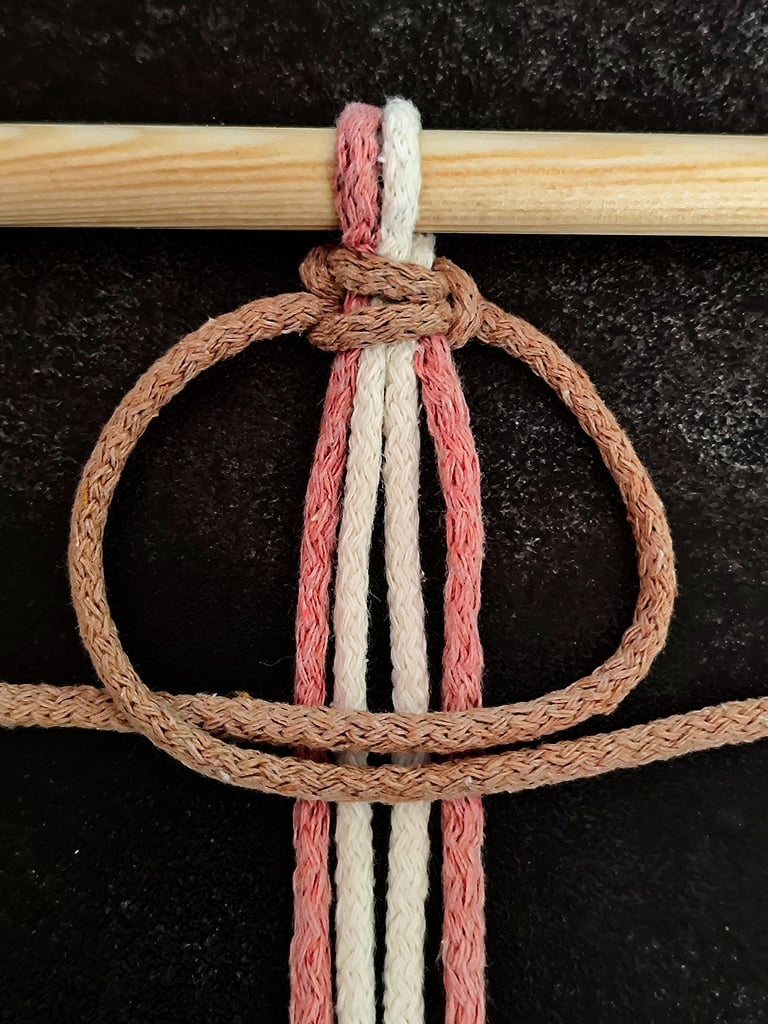
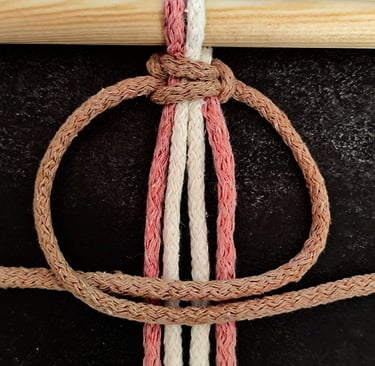
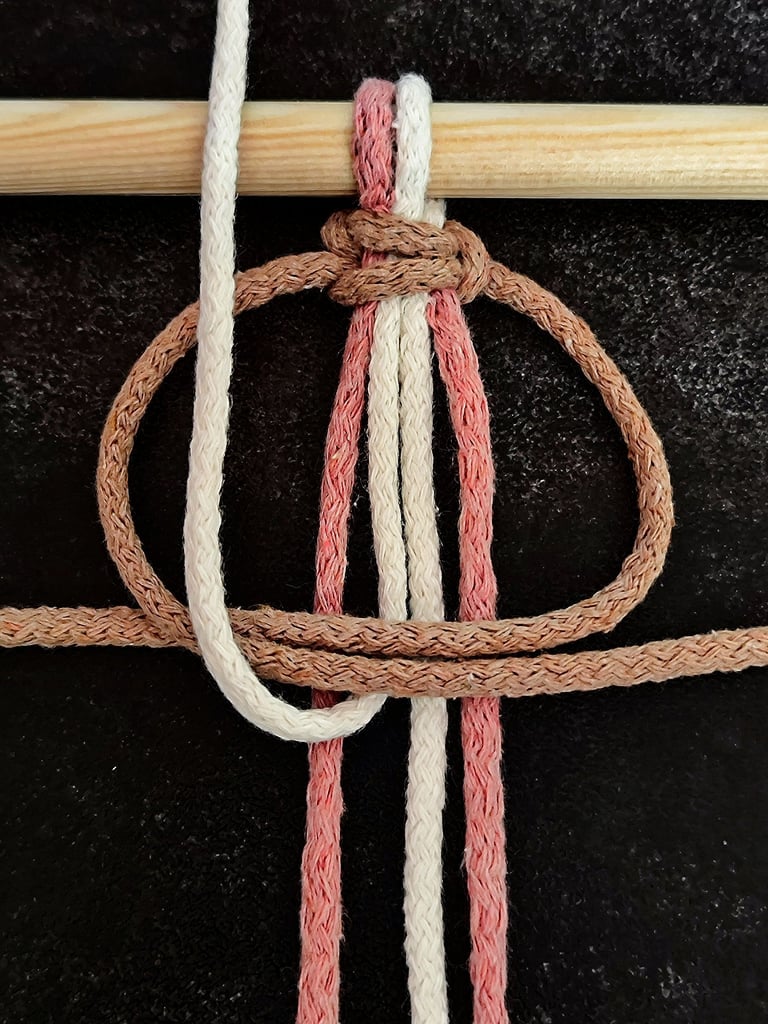
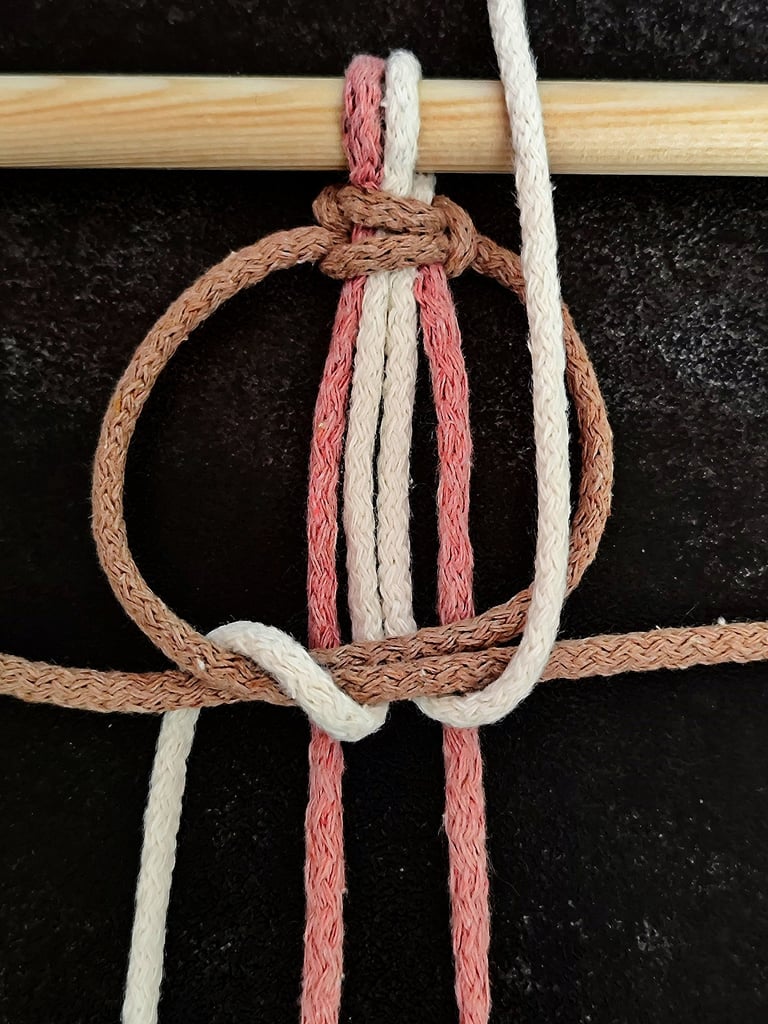
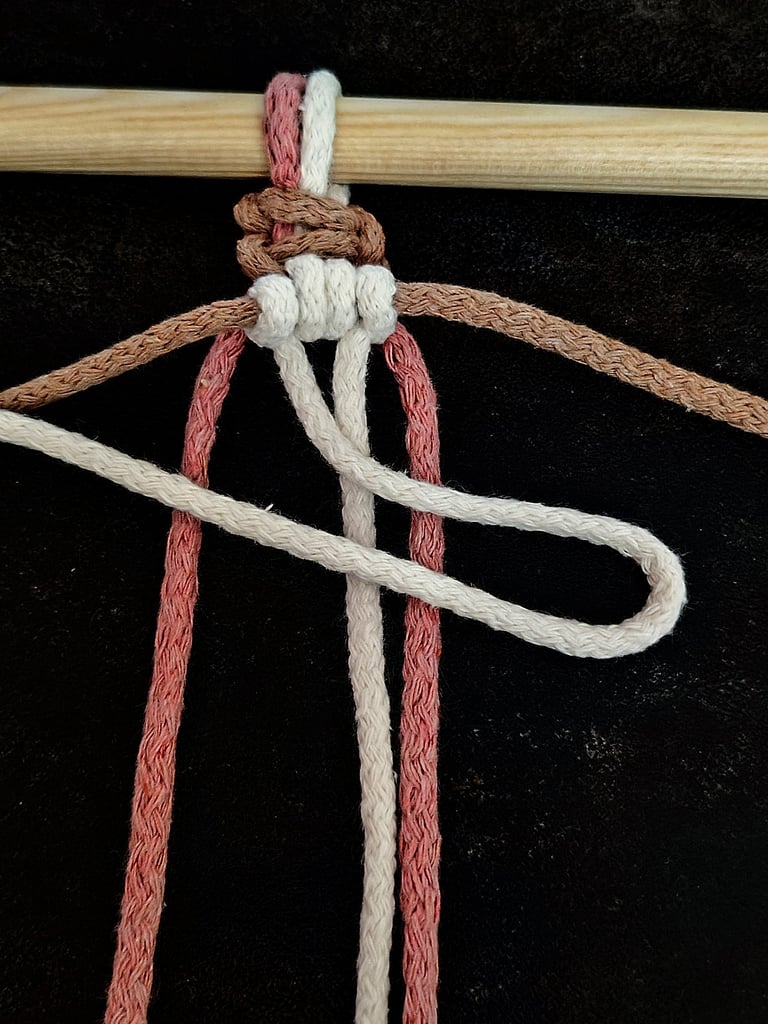
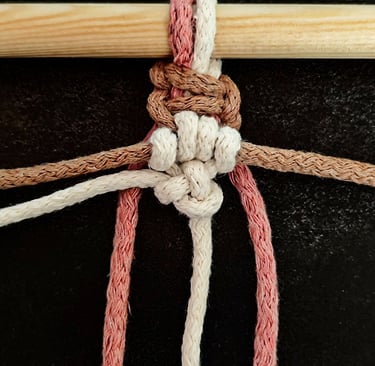
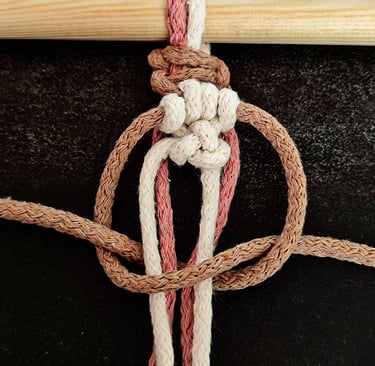
STEP 5
Tighten the Brown cords on both sides, then pull both White cords downward.
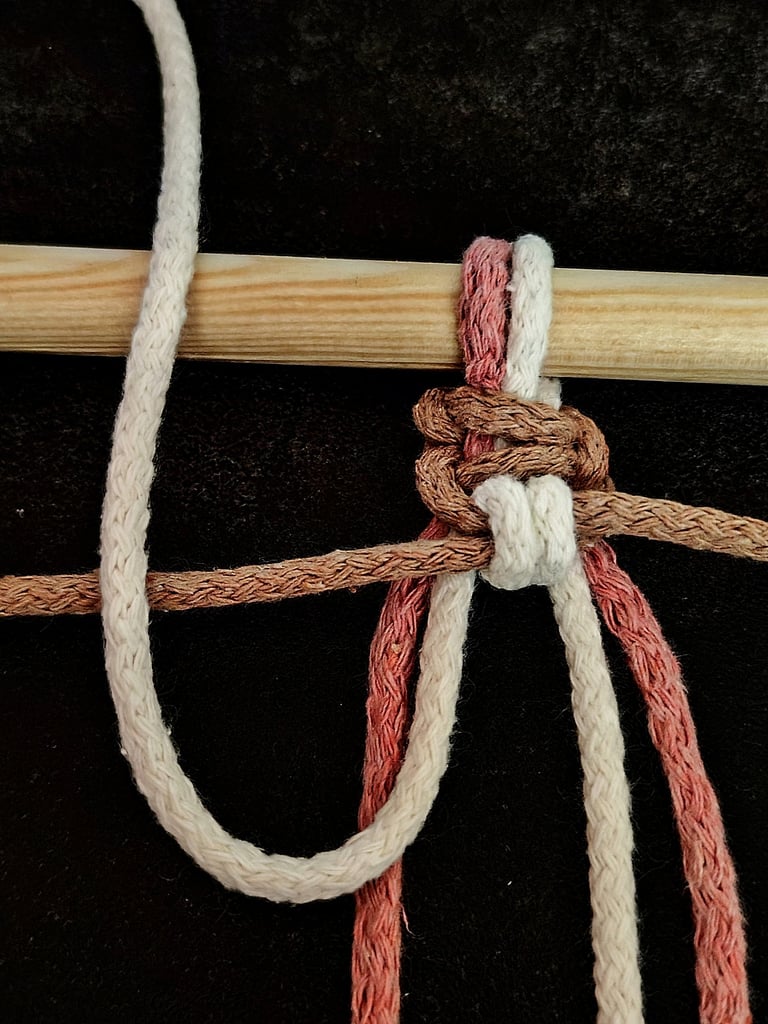
STEP 6
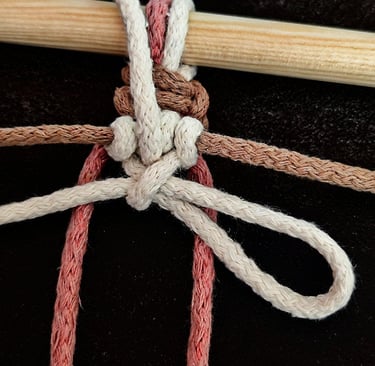
Use the left White cord as the working cord and the left Brown cord as the anchor cord. Pass the working cord up, across, and down through the loop to form a Half-Hitch knot. Pull tight to secure the knot.
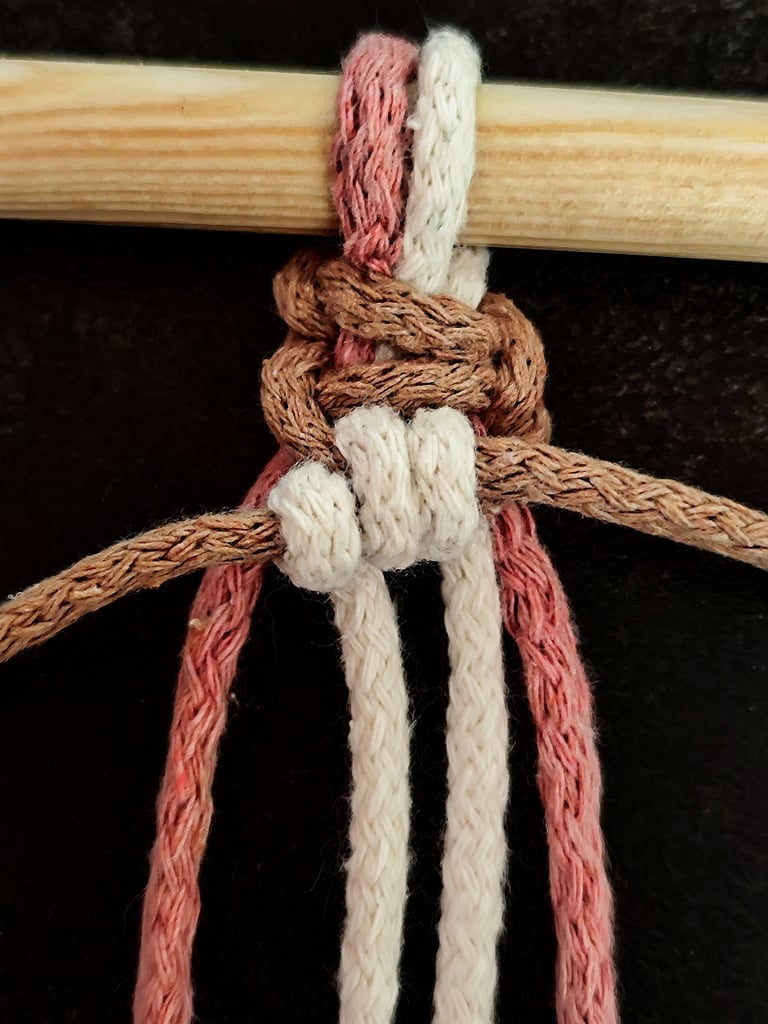
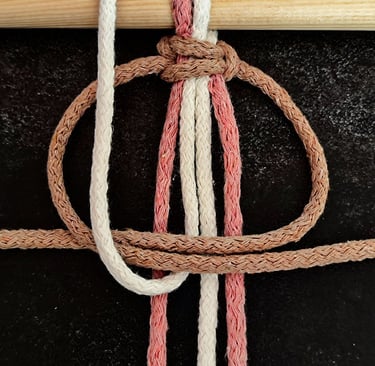
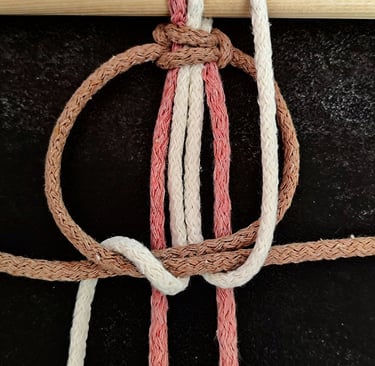
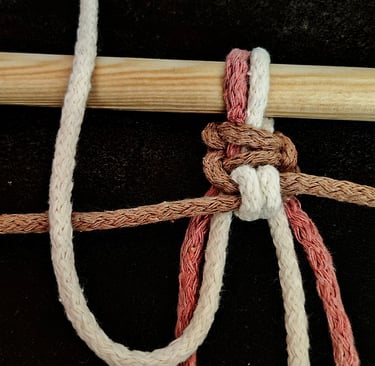
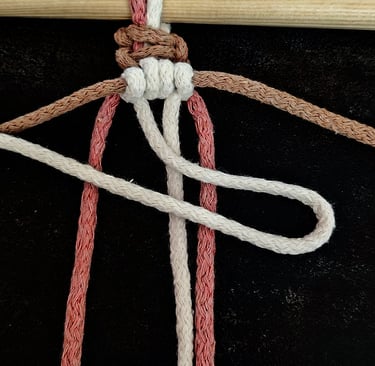
STEP 7
Use the right White cord as the working cord and the right Brown cord as the anchor cord. Tie 1 Half-Hitch knot on this side as well by passing the working cord up, across, and back down through the loop. Tighten to secure the knot.

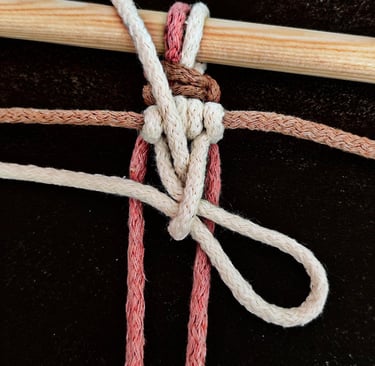
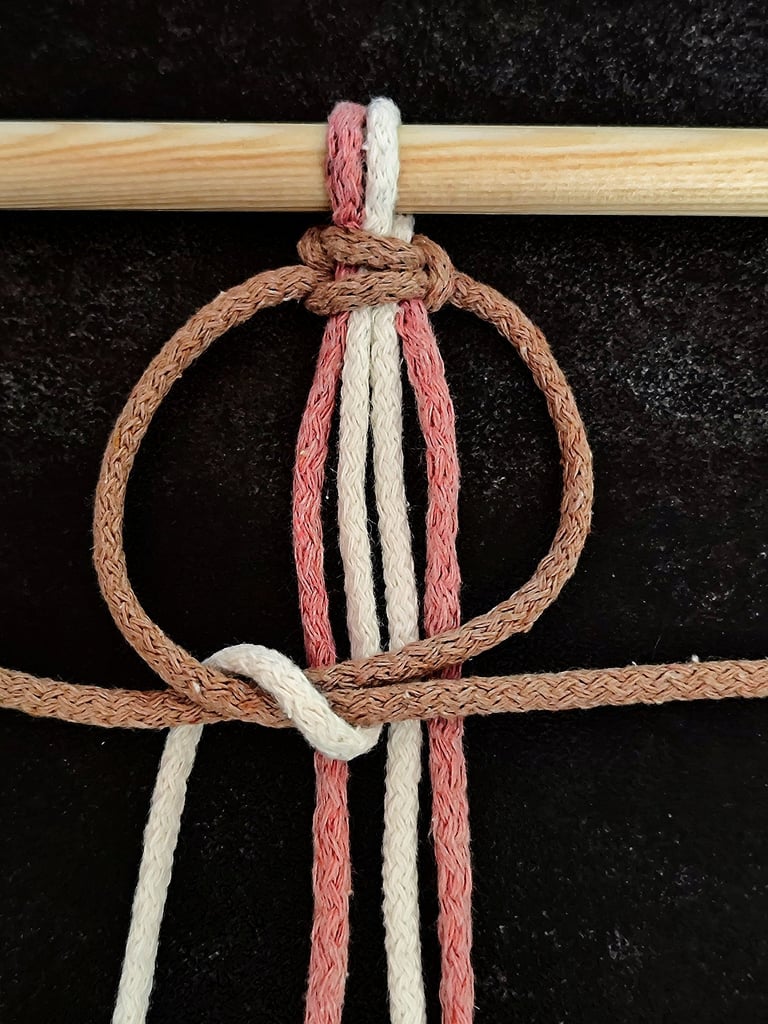
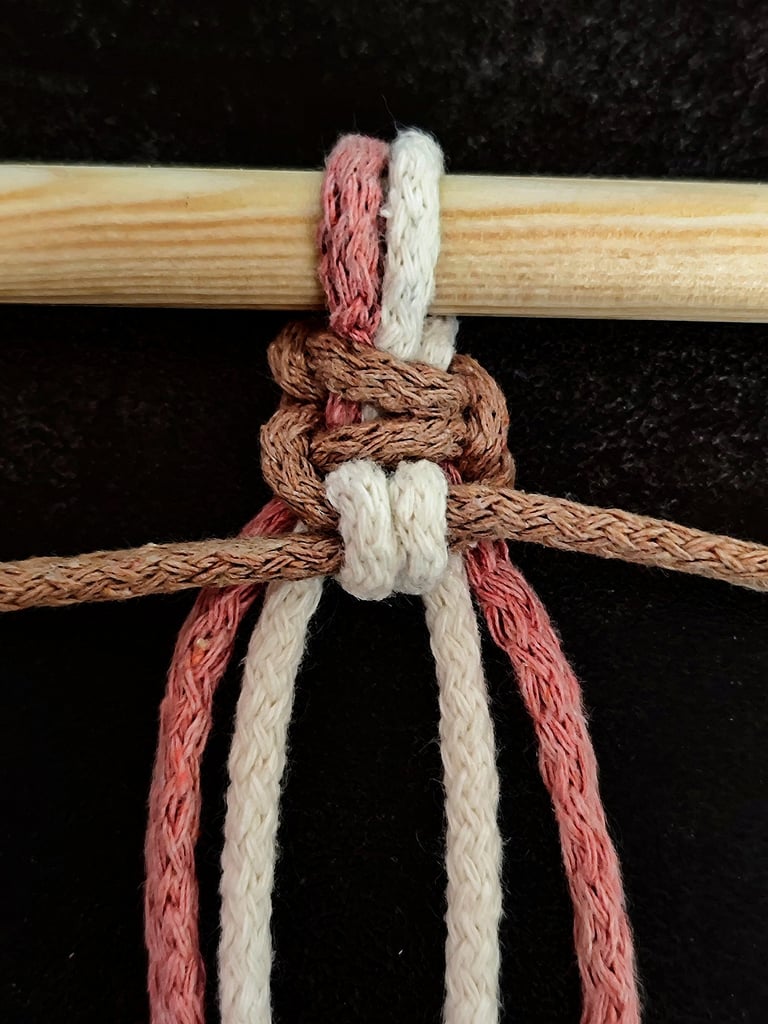
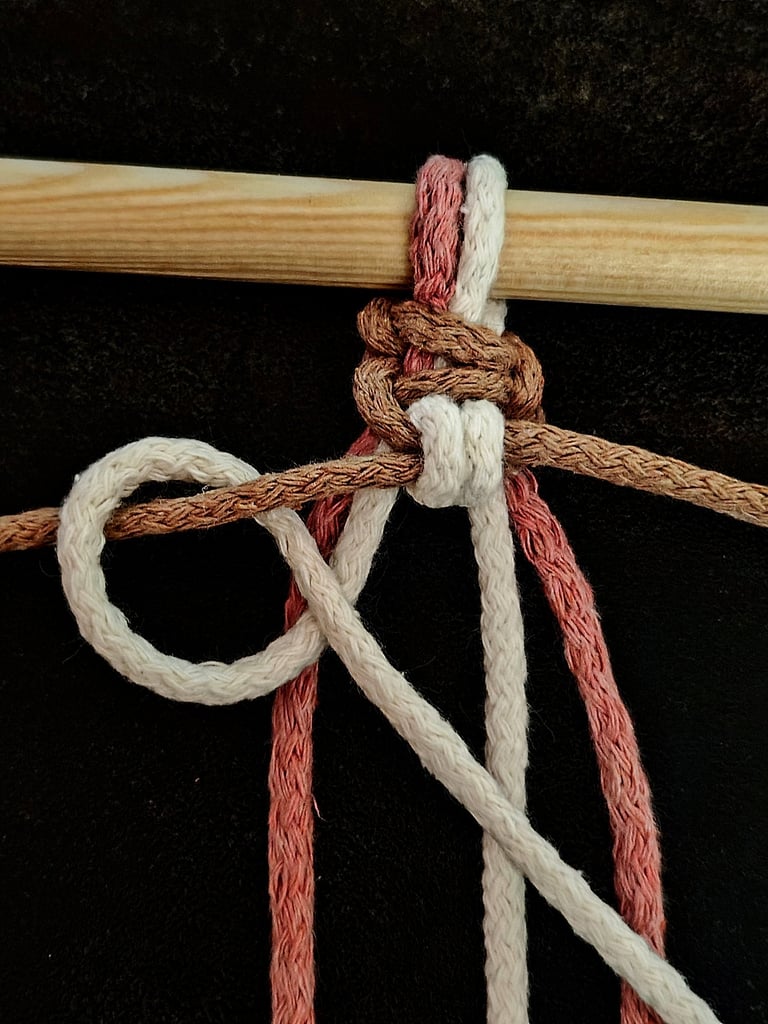
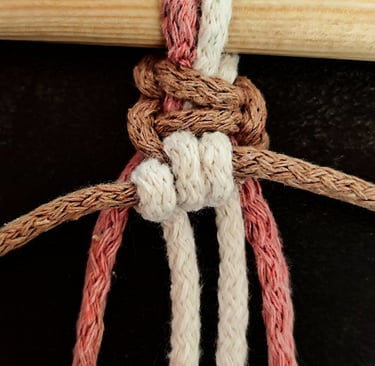
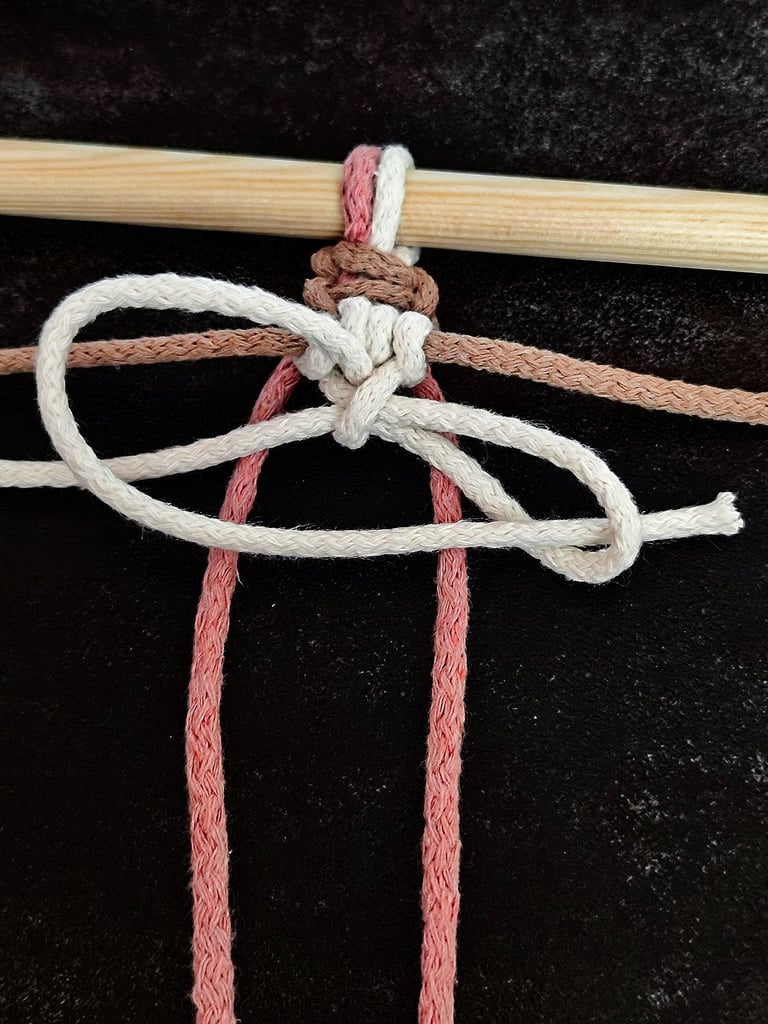
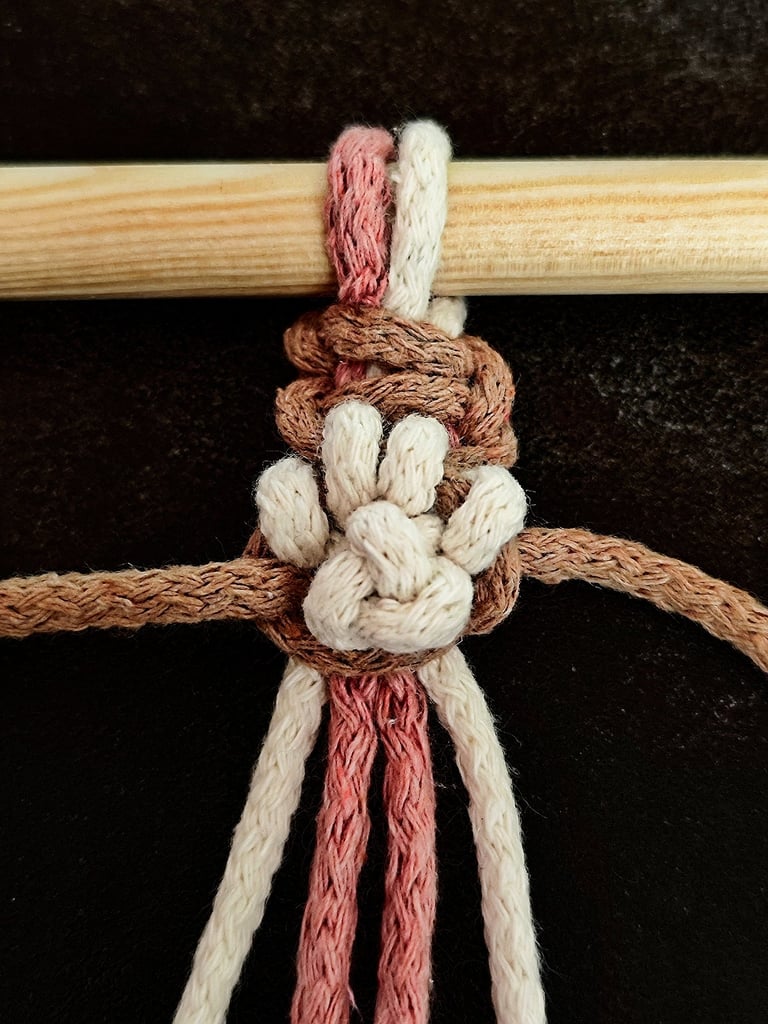
STEP 8
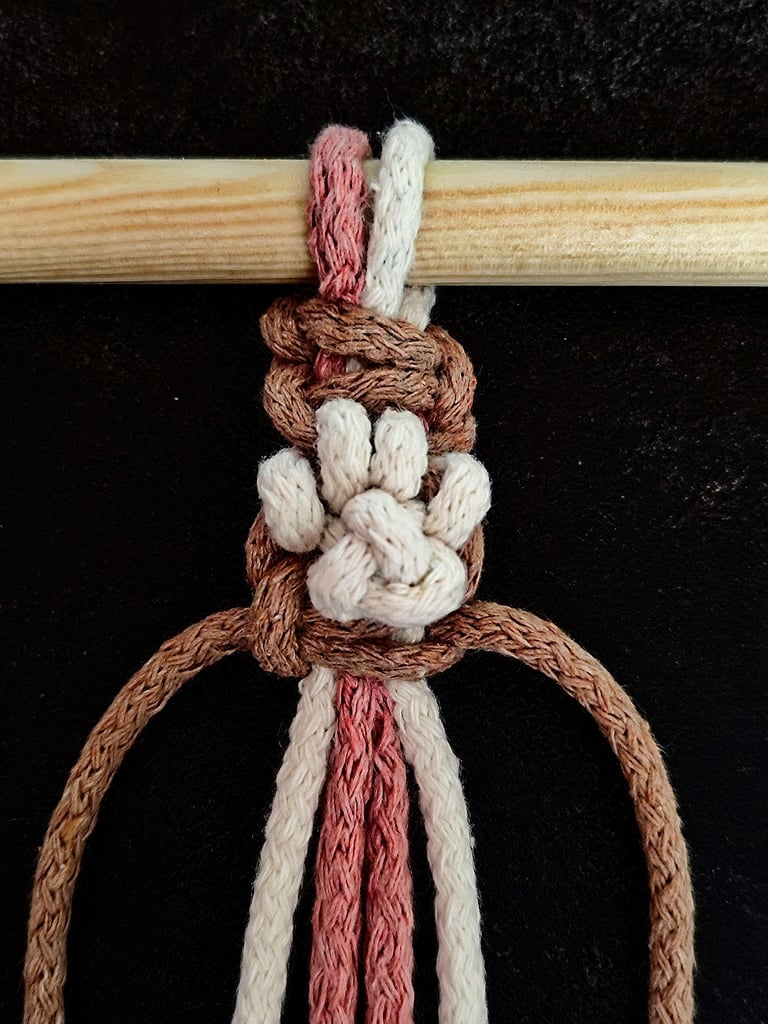
To create a 3-ply Crown knot, start by forming a loop with the left White cord. Next, place the right White cord over the top of the loop. Go across, underneath, and then back up between the space of both White cords.
STEP 9
Tighten the right cord to secure the knot.
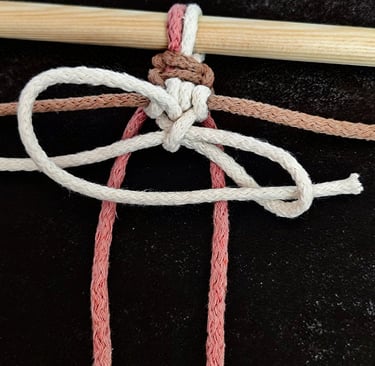
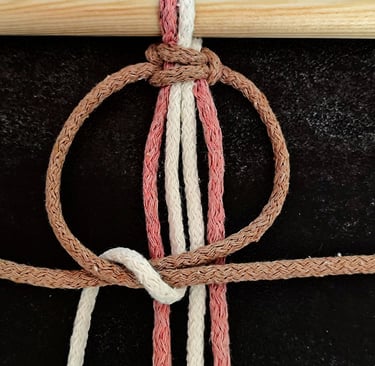
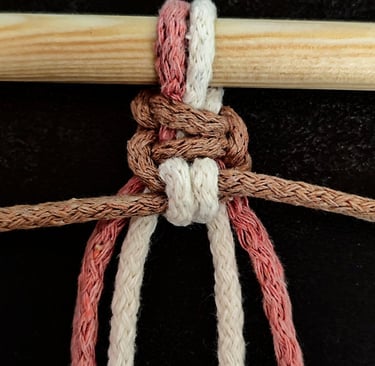
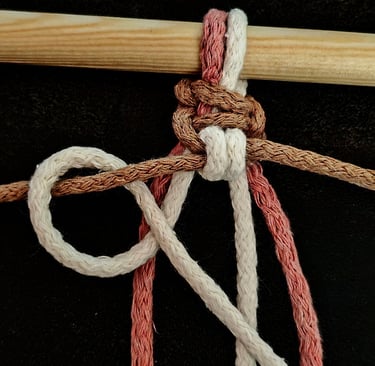
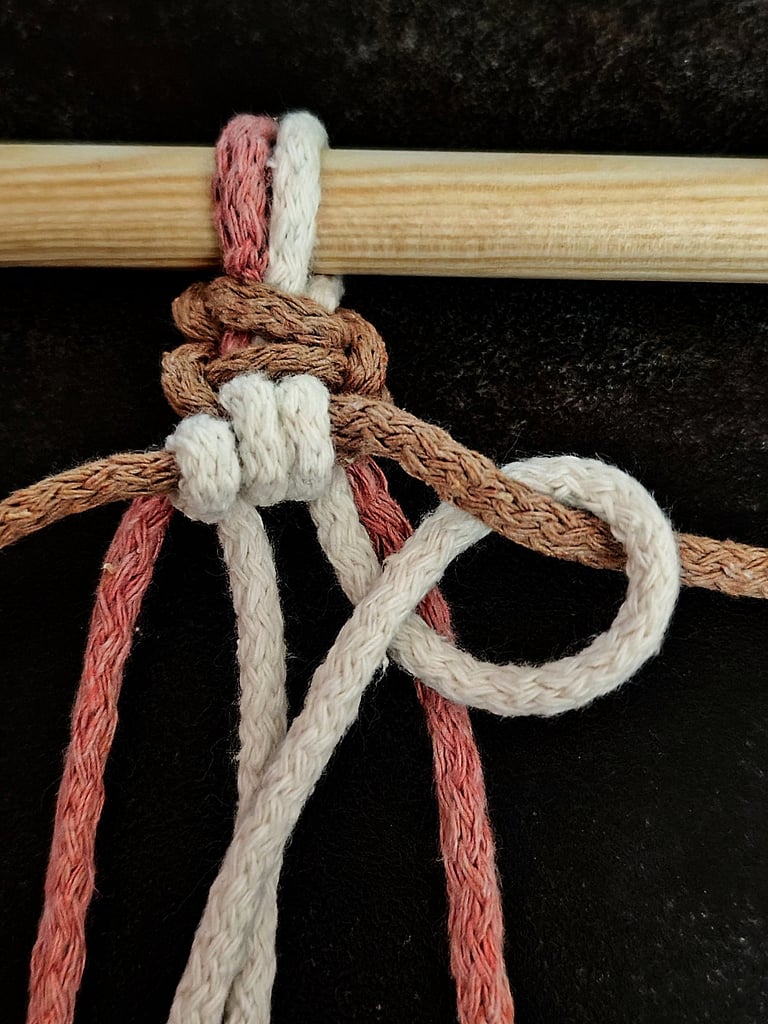
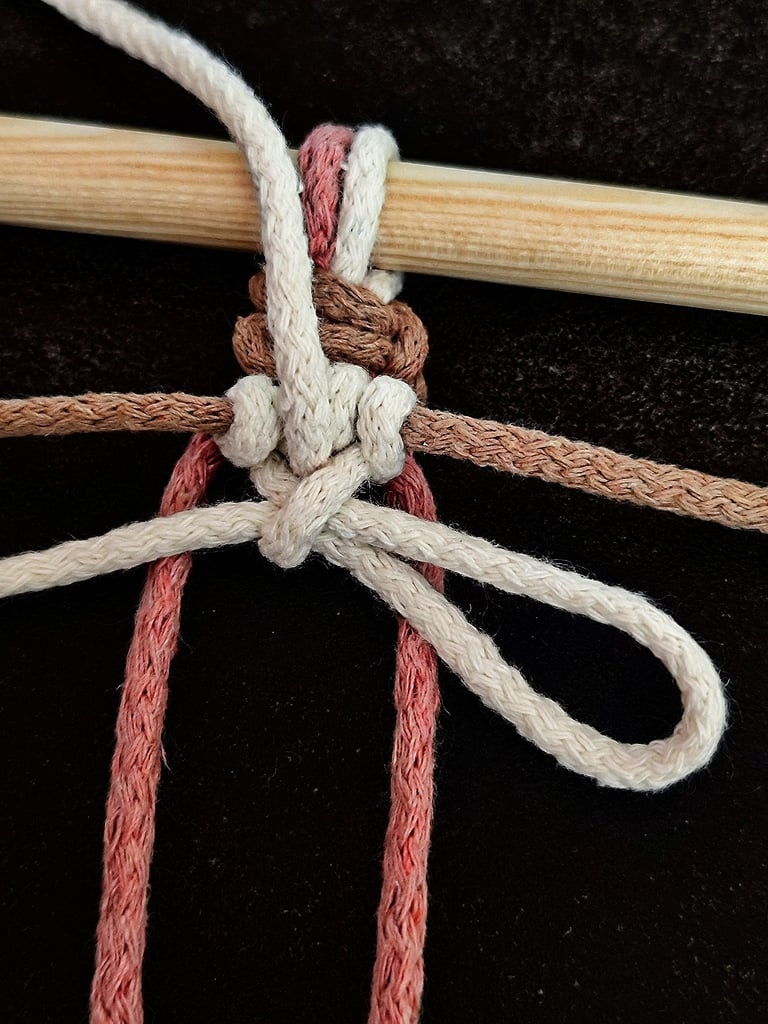
STEP 10
Use the cord’s end again and thread it through the loop.
STEP 11
Pull the left cord to tighten the knot, then adjust it so the knot sits in the middle.
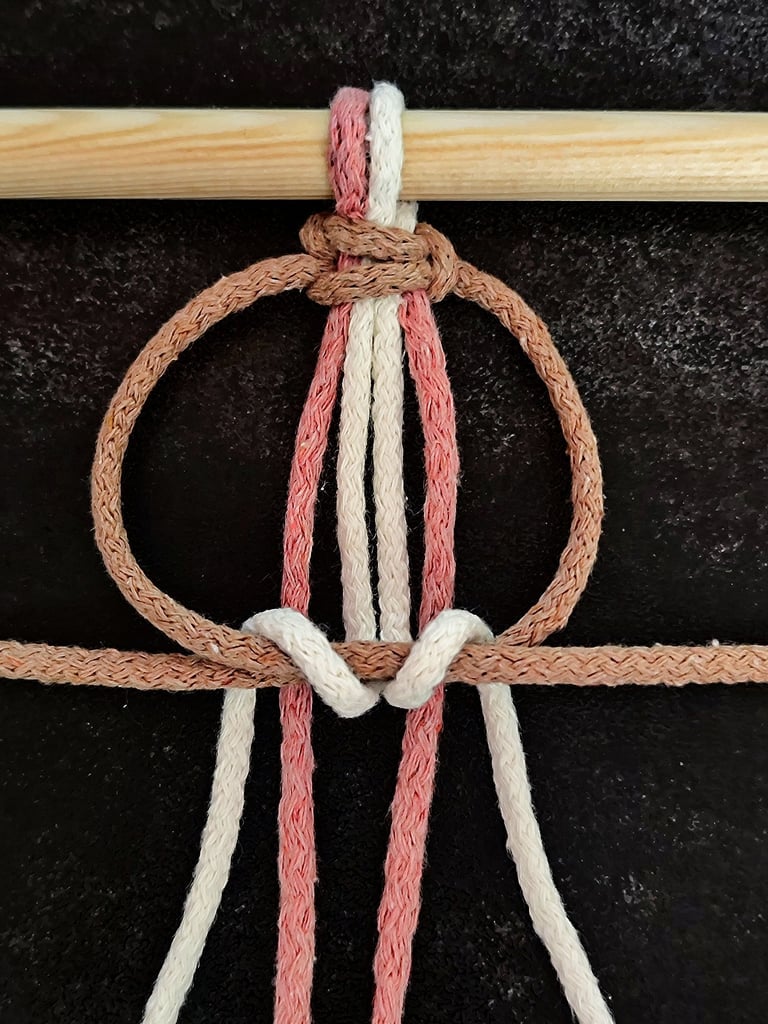
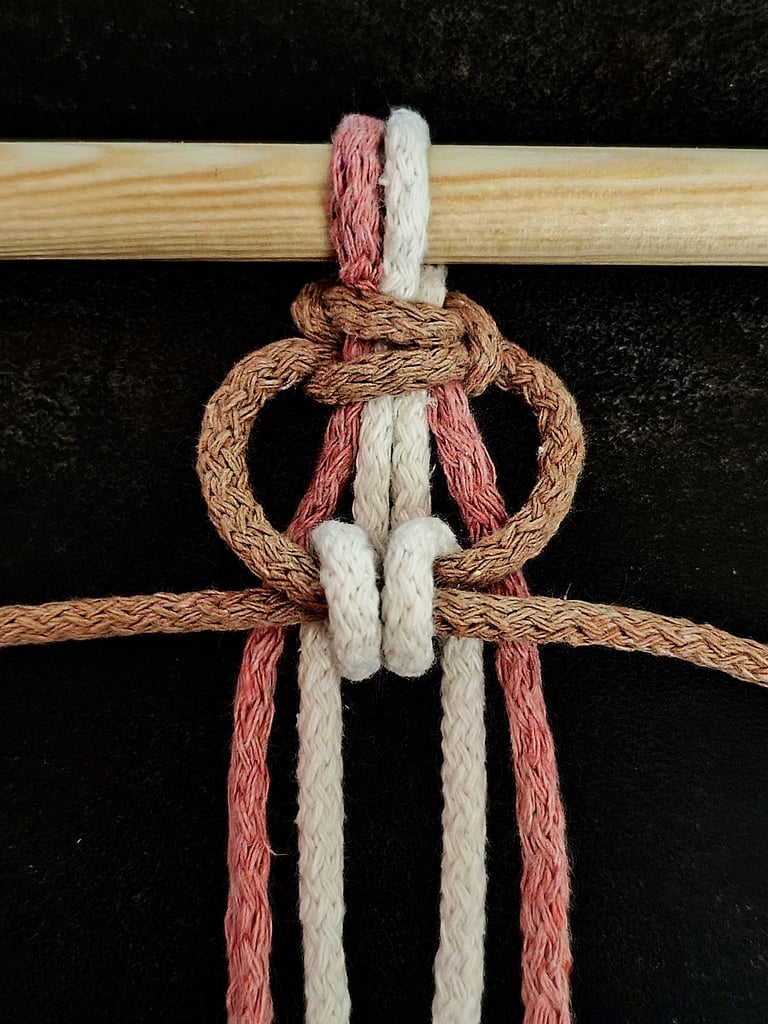
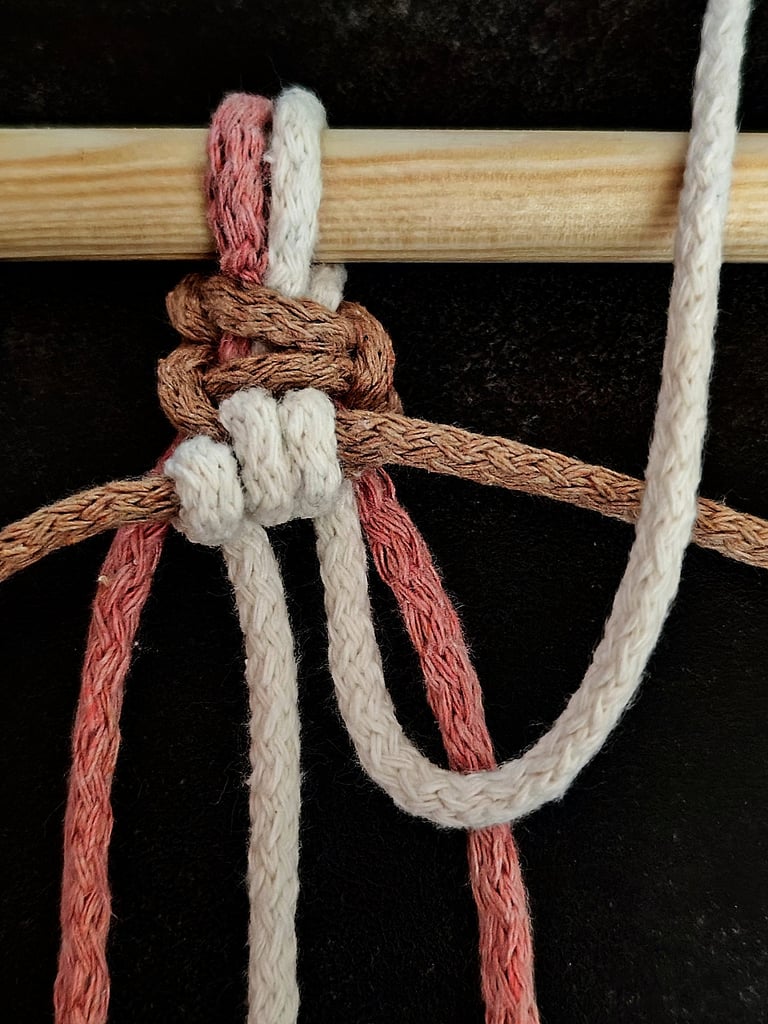
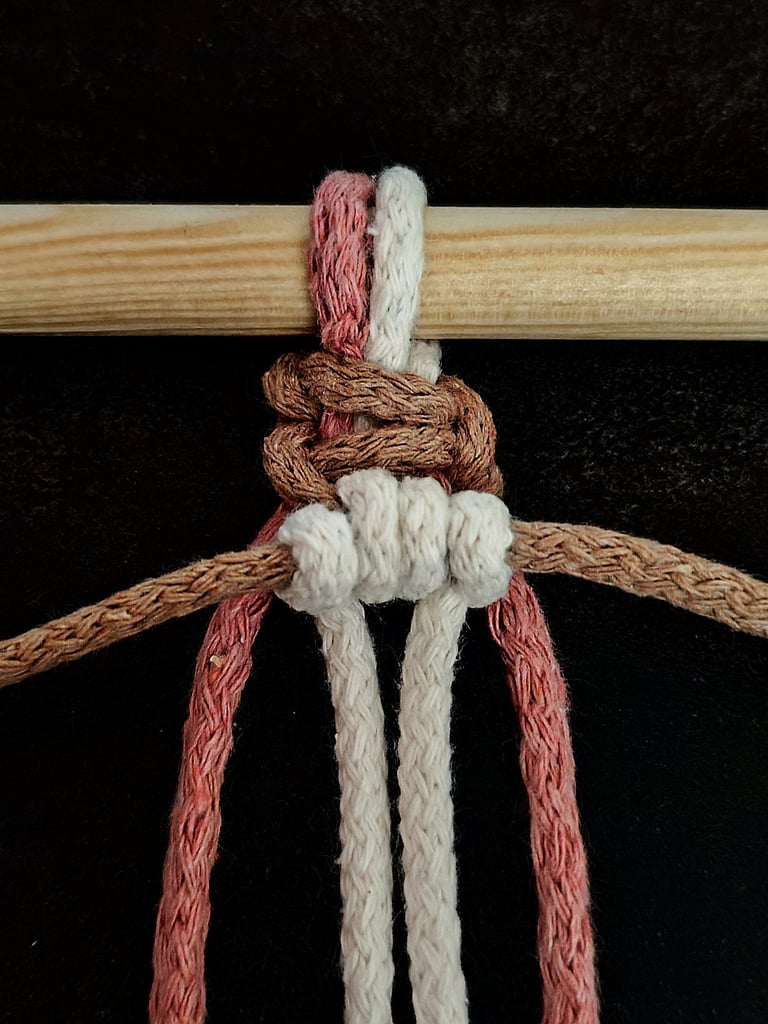
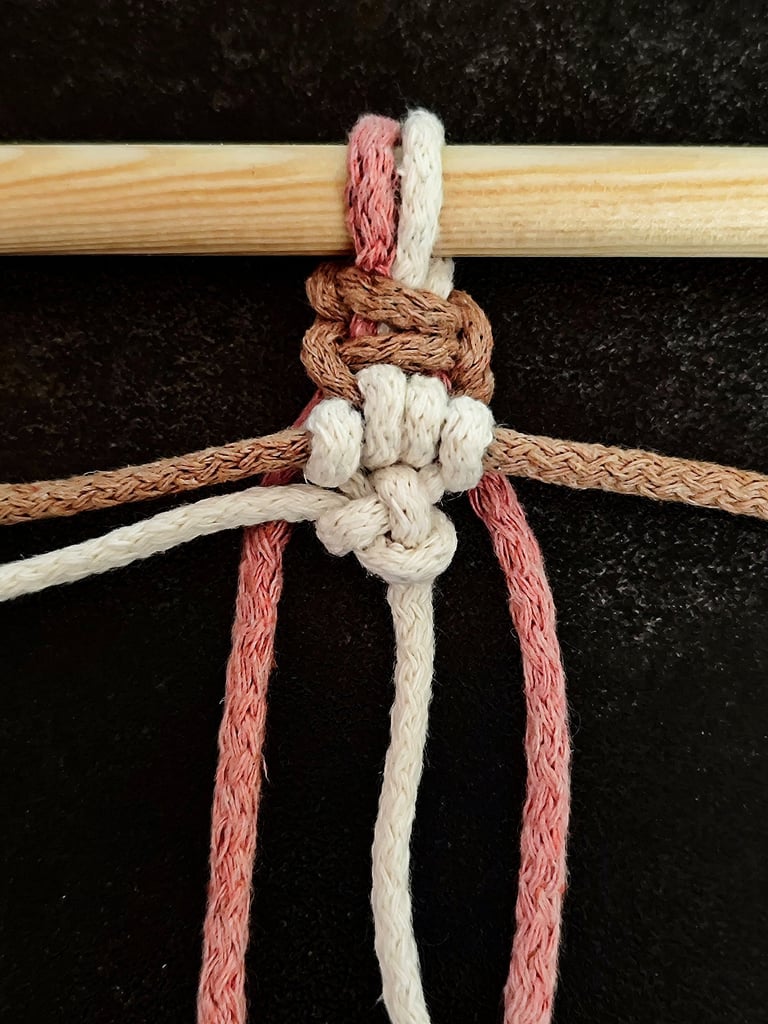
STEP 12
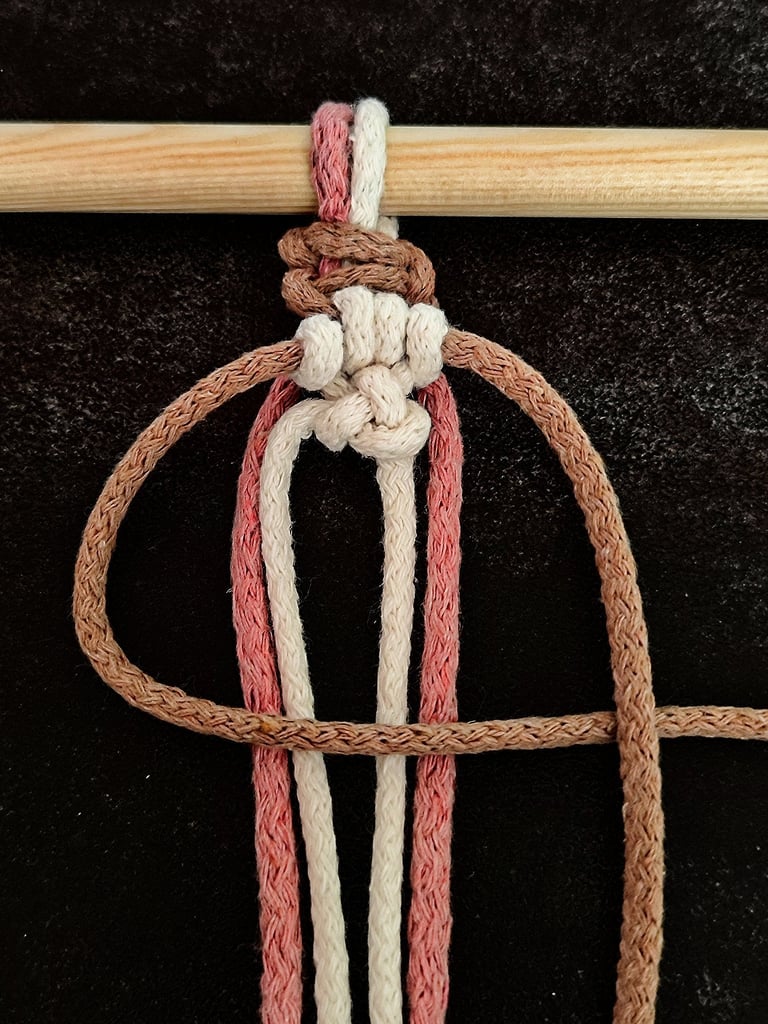
Using the Brown cords as the working cords, tie 1 Square knot directly beneath the 3-ply Crown knot. With the left cord, create a U-shaped loop pointing downward.
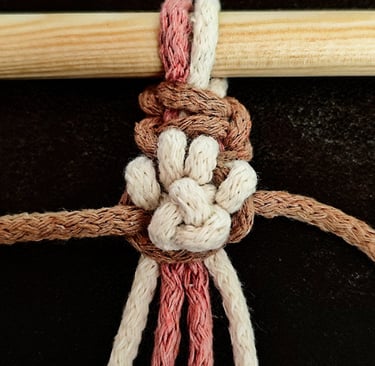
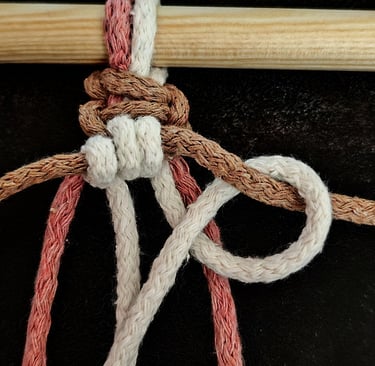
STEP 13
Then, take the right cord, cross it over the left cord, pass it underneath the anchor cords, and thread it through the loop on the left side.
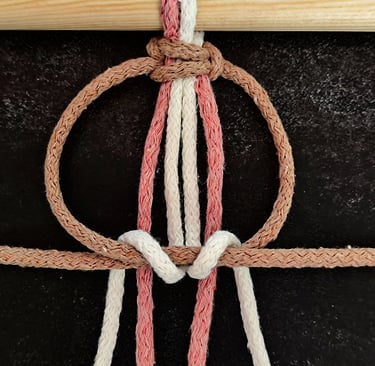
STEP 14
Pull the cords to tighten. As you tighten, the upper knot will gradually pop up.
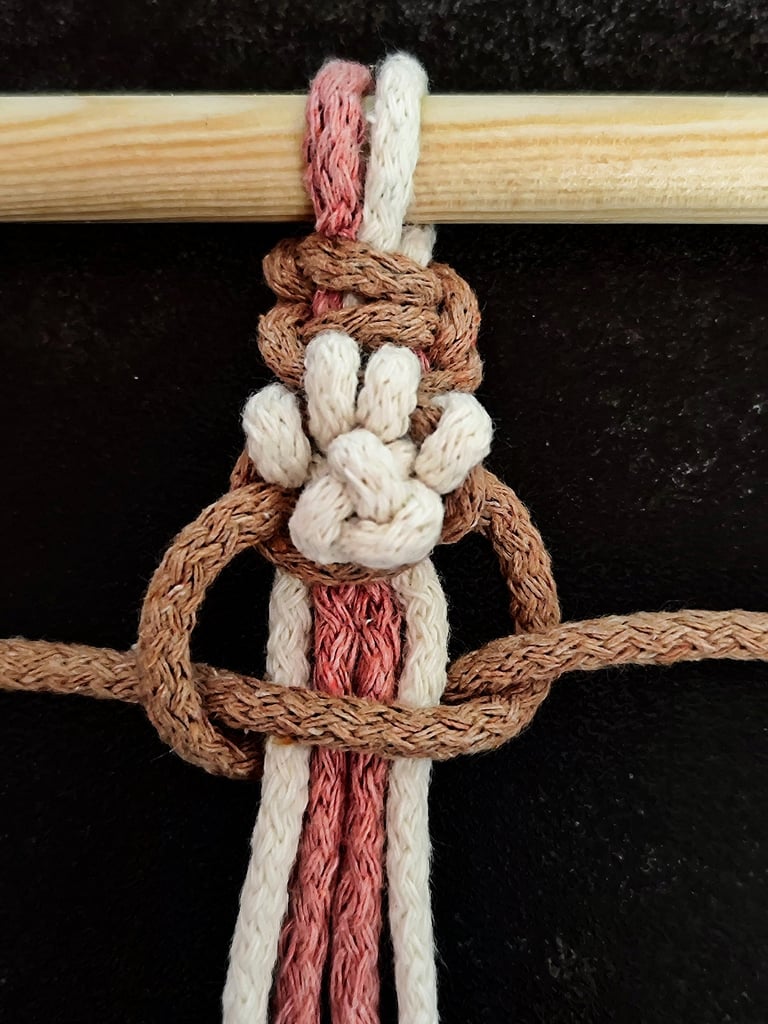
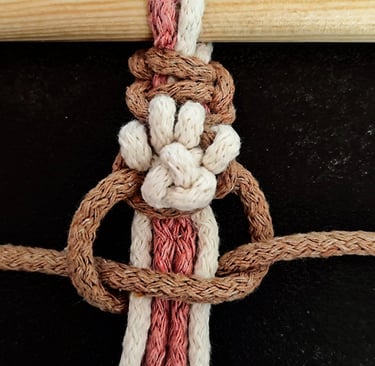
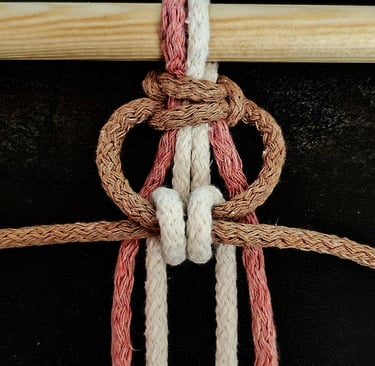
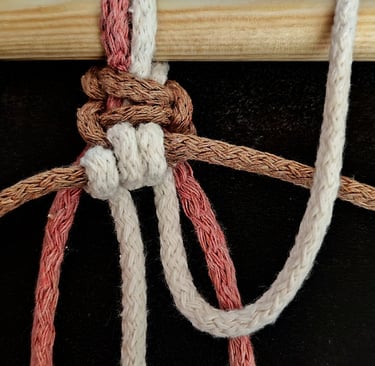
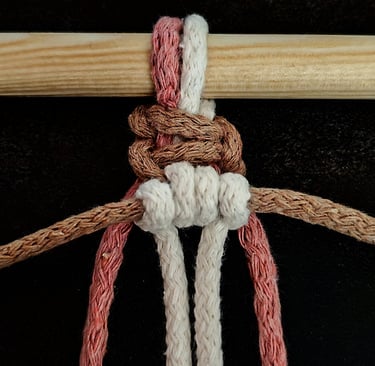
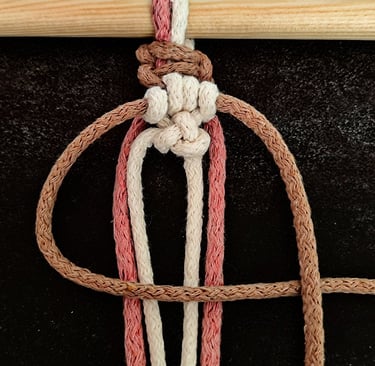
STEP 15
Using the right cord, make a U-shaped loop pointing downward. Then, take the left cord, cross it over the right cord, pass it underneath the anchor cords, and thread it through the loop on the right side.
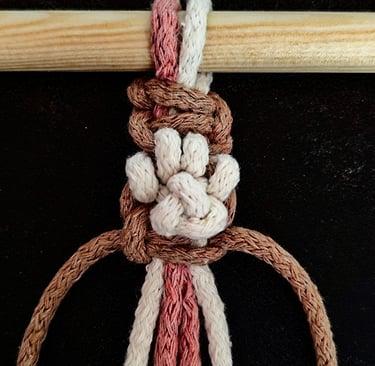
STEP 16
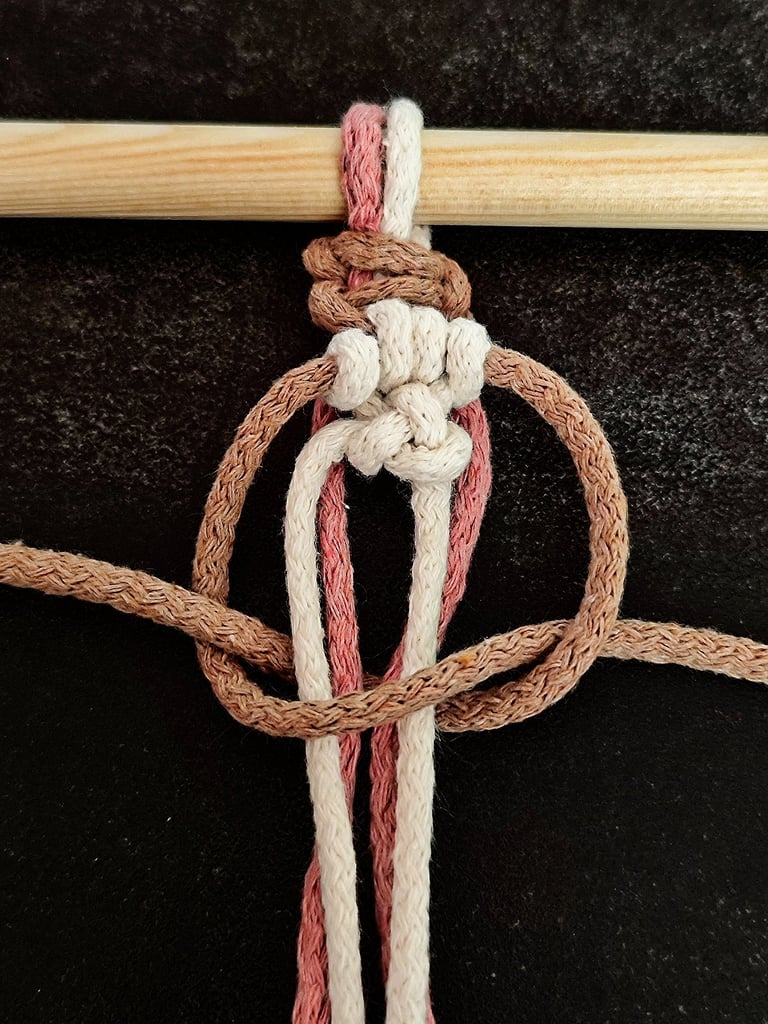
Pull the cords to tighten the knot securely. Adjust it as needed to ensure the knot is even and properly positioned.
Troubleshooting Common Issues
If your Cat Paw macrame knot looks uneven or loose, check your tension. Keeping consistent tension on your cords is essential for a neat knot. Practice pulling each section evenly to avoid slack or tight spots.
Sometimes, the pattern may not hold its shape well. This can happen if the cords are too slippery or thin. Choose a cord with some texture and thickness to maintain firmness in the knot.
If you find it hard to follow the steps, slow down and focus on one loop at a time. Macrame often requires patience. Rewatching a tutorial can help clarify tricky moves.
Common mistakes include twisting cords or crossing strands incorrectly. Use a flat surface and work in good lighting to see your cords clearly.
If knots become tangled, gently untwist cords without forcing. Tugging too hard can damage your work. Taking breaks can prevent frustration and give your hands a rest.
Remember to check your starting length to ensure you have enough cord for the project. Running out mid-knot is a common issue that interrupts your flow.
Keeping these points in mind will help you avoid and fix common macrame problems, improving your skills as you create the Cat Paw knot.